Schoology Integration
This guide details how to integrate Mindomo as an external tool within your Schoology course, enabling seamless access to Mindomo’s mind mapping features directly from the platform. Once set up, both teachers and students can easily create, view, and collaborate on mind maps without needing separate logins.
Add Mindomo as an External Tool
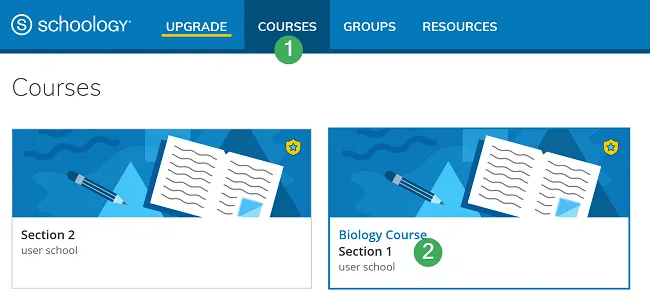
Section titled “Add Mindomo as an External Tool”Step 1. Go to the Courses section (1), then choose the course where you want to install Mindomo (2).
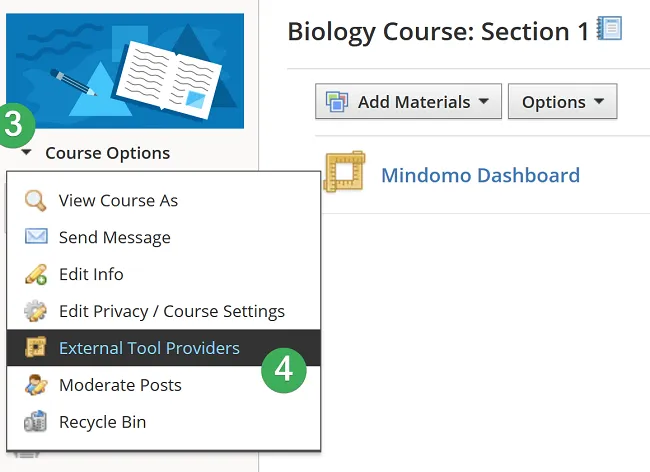
Step 2. Inside the course, select Course Options (3), then click External Tool Providers (4).
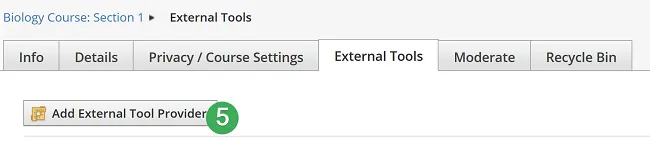
Step 3. Inside the External Tools panel, click Add External Tool Provider (5).
Step 4. The Add External Tool Provider dialog opens. Enter a name for the tool and complete the following steps:
- Add the Consumer Key and Shared Secret provided by Mindomo (6).
- Under Privacy, select the 4th option: Send Name and Email/Username of user who launches the tool (7).
- Set Configuration type to Manual and Match By Domain (8).
- Add the following domain/URL:
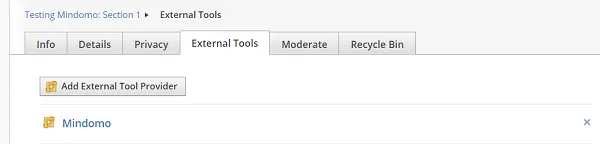
https://www.mindomo.com/lti/index(9). - Click Submit (10). Mindomo will appear in the External Tools list.

Working with Mindomo
Section titled “Working with Mindomo”Learn how teachers and students can access and use Mindomo directly within a Schoology course. This section explains how to add Mindomo resources, open the Mindomo dashboard, view or edit mind maps, and work with mind map assignments without separate logins.
Direct Access to Mindomo
Section titled “Direct Access to Mindomo”Inside your course, you can add different types of materials through the Mindomo integration.
Step 1. Open your course and click Add Materials → Add File/Link/External Tool (1), then select External Tool in the dialog.
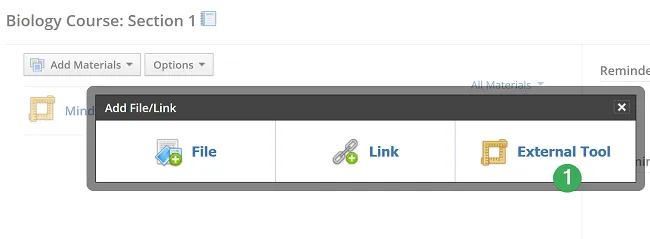
Step 2. Add your Mindomo Dashboard to access your Mindomo account directly, without any additional login.
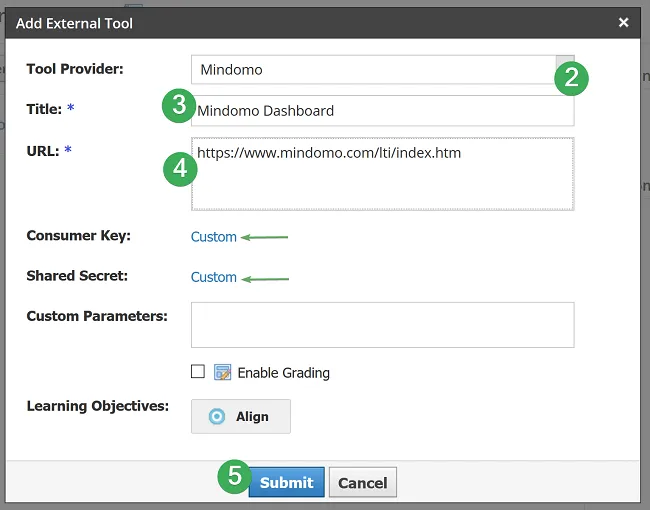
- From the Tool Provider (2) drop-down menu, select Mindomo.
- Add a title for the resource, for example Mindomo Dashboard (3).
- In the URL field, add:
https://www.mindomo.com/lti/index(4). - The Consumer Key and Shared Secret are filled in automatically. Click Submit (5).
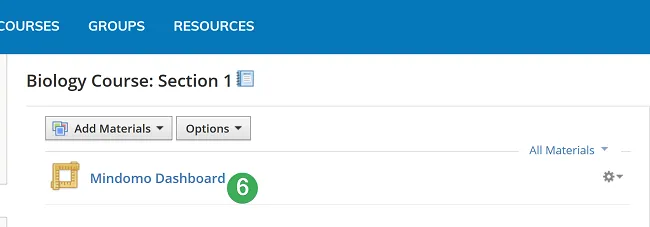
You will now see the Mindomo Dashboard link inside your course (6). Click it to access your Mindomo account directly, where you can create and edit mind maps, concept maps, outlines, and more.
Attaching mind maps to courses
Section titled “Attaching mind maps to courses”How to add a viewable mind map
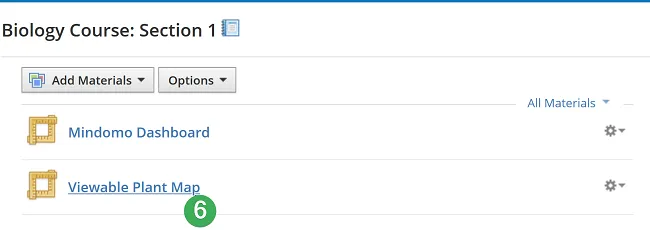
To add a viewable mind map that you have already created as a course resource, follow these steps:
Step 1. Open your course and click Add Materials → Add File/Link/External Tool (1), then select External Tool.
Step 2.
- Select Mindomo from the Tool Provider drop-down menu (2).
- Add a title for your mind map (3).
- In the URL field, add:
https://www.mindomo.com/lti/view/mapID(4). - Click Submit (5).
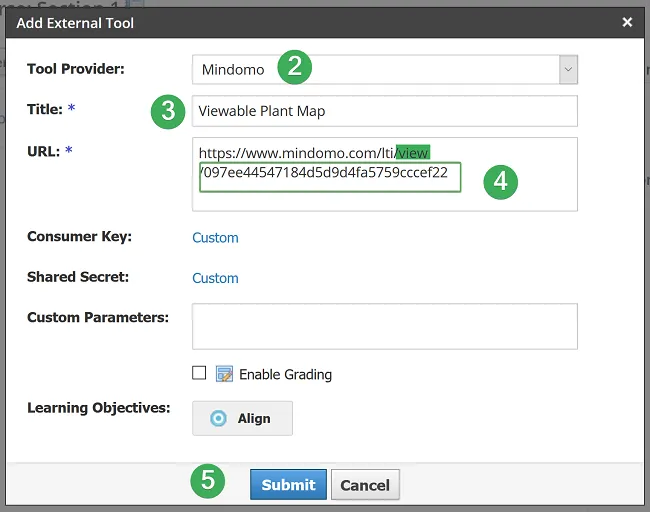
To find the mapID, open your Mindomo Dashboard, click the three dots next to the map, and select Share this map.
In the Share dialog, the map ID is the last sequence of letters and numbers in the map URL, after the final /.
Step 3.
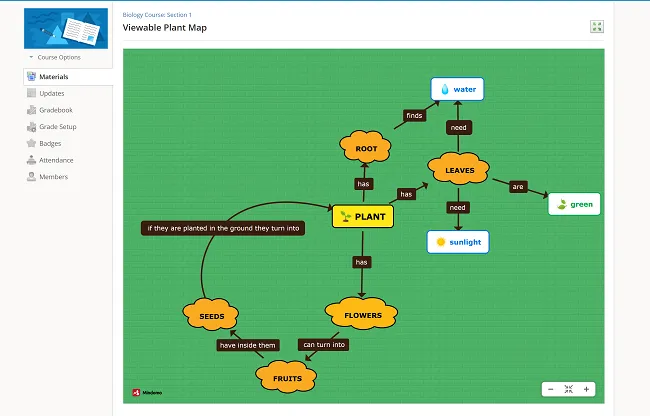
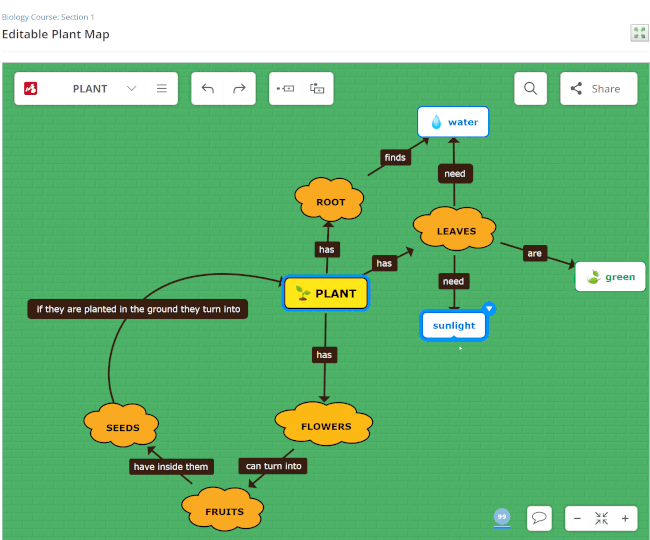
This is how users will view the map when accessing the link from the course section (6):
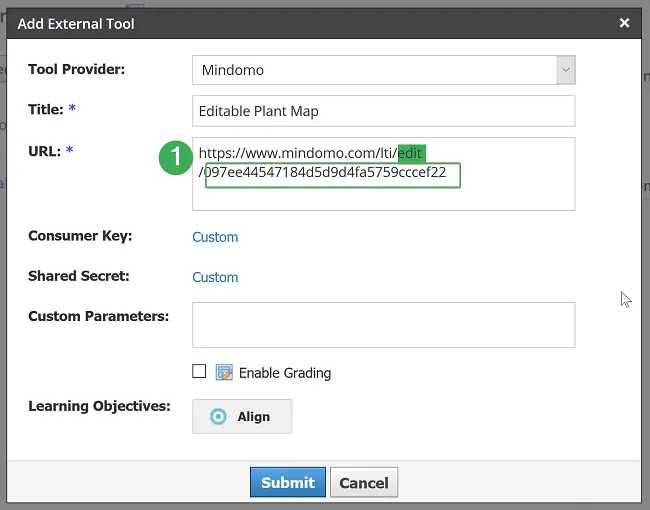
How to add an editable mind map
Follow the same steps as above, except for Step 2:
- Enter a title for the map.
- Add
https://www.mindomo.com/lti/edit/mapIDin the URL field (1), then click Submit.
The map ID is the last sequence of letters and numbers in the map URL, after the final/.
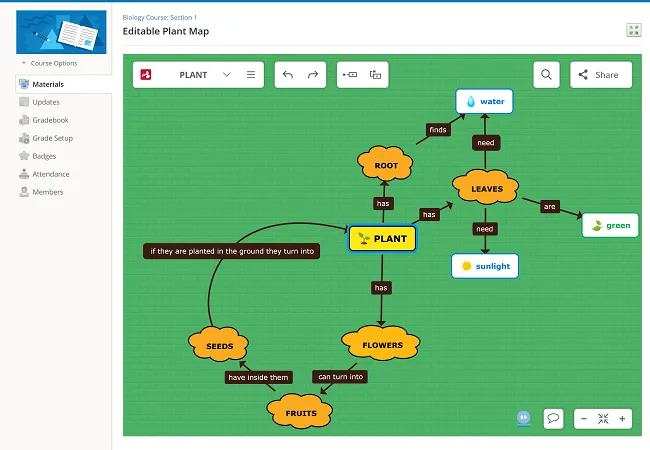
Users will now be able to view and edit the map directly from the course section.
Mindomo Assignments
Section titled “Mindomo Assignments”Students can work individually or in groups to create mind maps on subjects covered in your Schoology courses. They can work on assignments directly from Schoology without creating separate accounts or logging into Mindomo. Once students begin their assignments, teachers can access and grade their maps directly from Schoology.
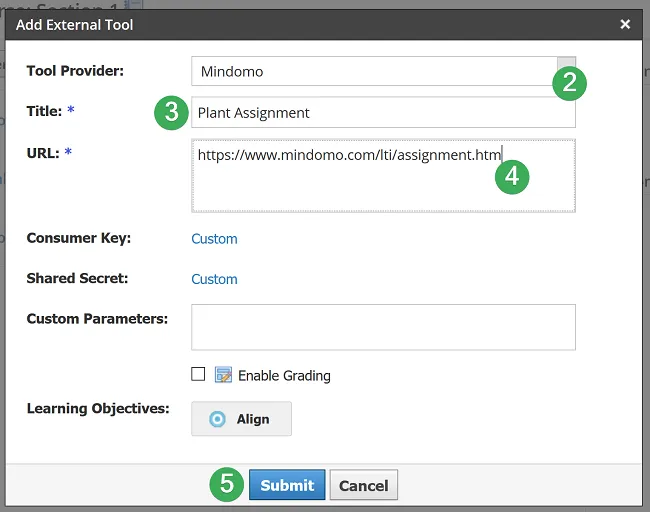
Step 1. Open your course and click Add Materials → Add File/Link/External Tool (1), then select External Tool.
Step 2.
- Select Mindomo from the Tool Provider drop-down menu (2).
- Enter the assignment name in the Title field (3).
- Add
https://www.mindomo.com/lti/assignmentin the URL field (4). - Click Submit to create the assignment (5).
How to set up your assignment
When you open the assignment for the first time, the Settings panel (1) appears, allowing you to choose an assignment type:
- Each student submits an individual mind map (2).
- Students submit individual maps using a shared starter map (3). Click Choose to select the map.
- All students collaborate on a new map or edit a shared map (4).
- You can attach resources to the assignment at any time (5). When finished, click Update Assignment (6).
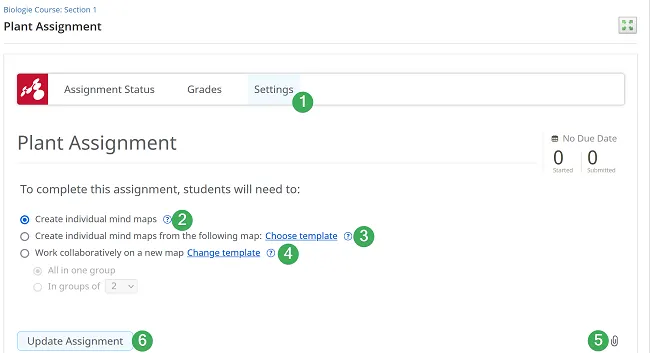
Clicking Update Assignment creates the assignment in both Schoology and Mindomo.
Each time you access the assignment, you are redirected to the Assignment Status section, where you can view each student’s status (7) and track progress (8).
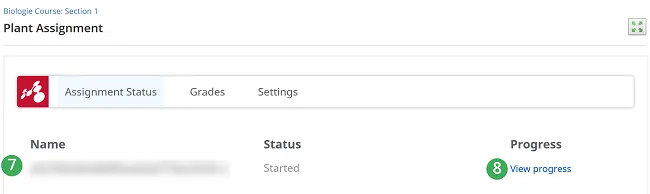
Click View Progress to open the mind map.
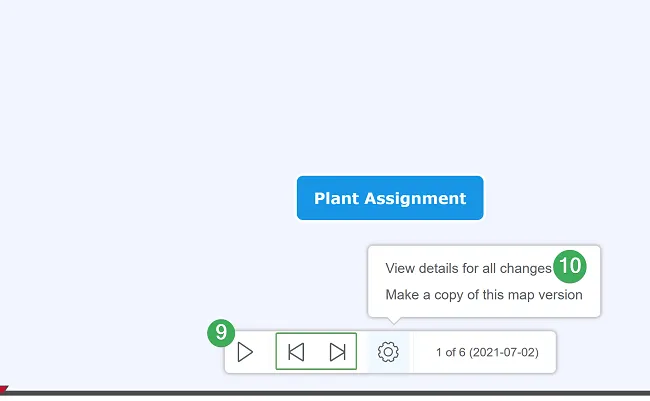
Use the Play button to enter Playback mode (9). The Rewind and Forward buttons move to the beginning or end of the playback.
For a detailed history, click Options → View details for all changes (10). You can view all map edits chronologically and filter activity by student.
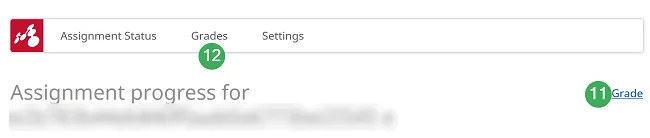
You can grade each student (11) and view all grades for the assignment (12).
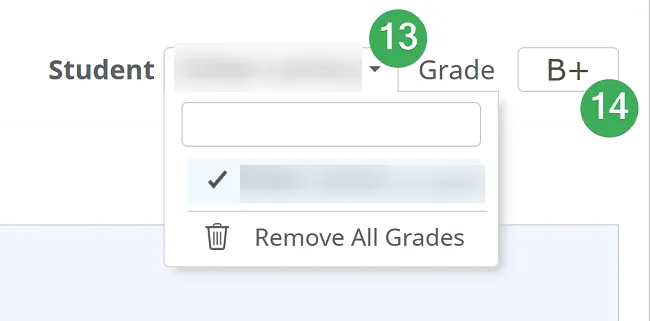
Each student is graded individually by selecting them from the list (13) and entering the grade (14). Students who have already been graded are marked with a checkmark.
When a student is selected, all details of their activity appear below, and you can start a private discussion.
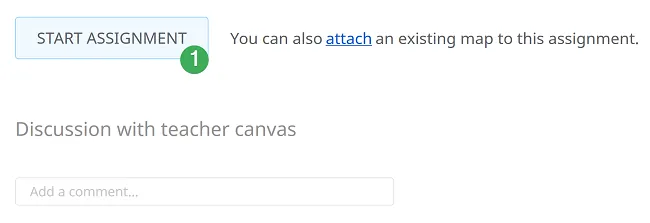
How will students work on their mind map assignments?
When students first click an assignment link or any other Mindomo resource in the course, they are automatically given a Mindomo account and added to your school license.
Inside the assignment, students can:
- Start the assignment (1).
- Attach another mind map (2).
- Communicate privately with the teacher who created the assignment (3).
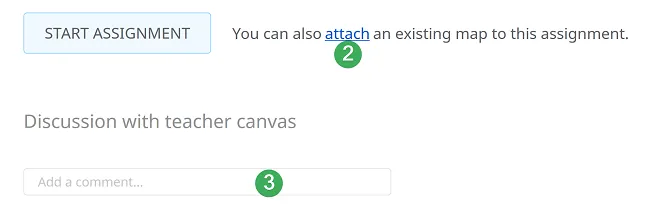
- When returning to an assignment, click Continue Assignment (4).
- Submit the assignment when finished (5).
- Restart the assignment at any time (6). Previous work will be lost, and a warning is shown.
- Check grades at any time.
