

My Account panel
To open the Account panel, click your initials or profile picture in the top-right corner of the dashboard, then select Account.
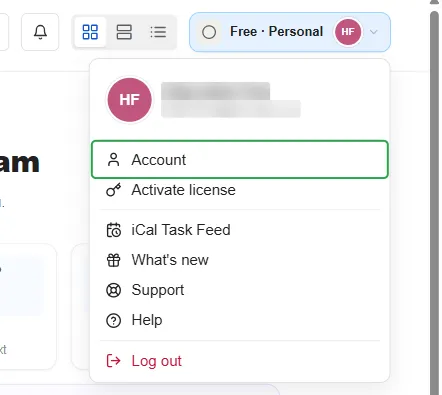
The panel opens on Membership > Plan & billing. Use the menu on the left to move between the Membership, Profile, Settings, Apps, API, and MCP sections, and click Back to dashboard to return to your diagrams.
Membership
Section titled “Membership”Plan & billing on a free account
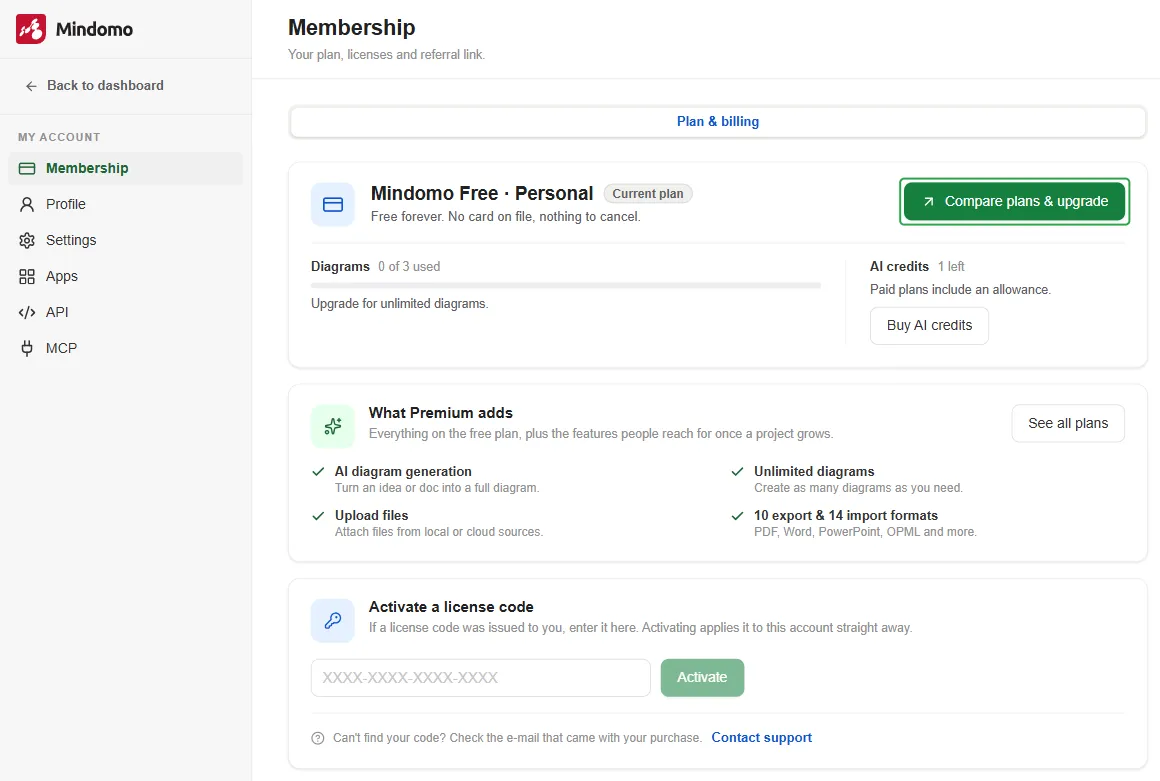
Section titled “Plan & billing on a free account”On a free account, the Plan & billing tab shows your current plan, Mindomo Free. Below it you can see:
- Diagrams: how many of the 3 diagrams included in the free plan you have used.
- AI credits: how many AI credits you have left. The free plan includes 1 AI credit so you can try the AI features.
The What Premium adds block gives an overview of what you get with Premium. Mindomo also has other plans, such as Professional, Team, and the education plans. To see them all and upgrade, click Compare plans & upgrade at the top of the tab to open the pricing page.
Plan & billing with a purchased plan
Section titled “Plan & billing with a purchased plan”If you have purchased a plan, the Plan & billing tab shows its name, marked Current plan, and the date it runs until. Below it you can see:
- Diagrams: how many diagrams are in your account. Purchased plans have no diagram limit.
- AI credits: your remaining credits, used for generating a diagram with AI and for the AI tools on a topic inside the editor. Click Buy AI credits to add more.
- Storage: how much of your storage you have used. Click Buy storage to add more.
- Purchases and invoices: every payment on your account, newest first, with its date, amount, and status. Click View to open an invoice, or Download to save it.
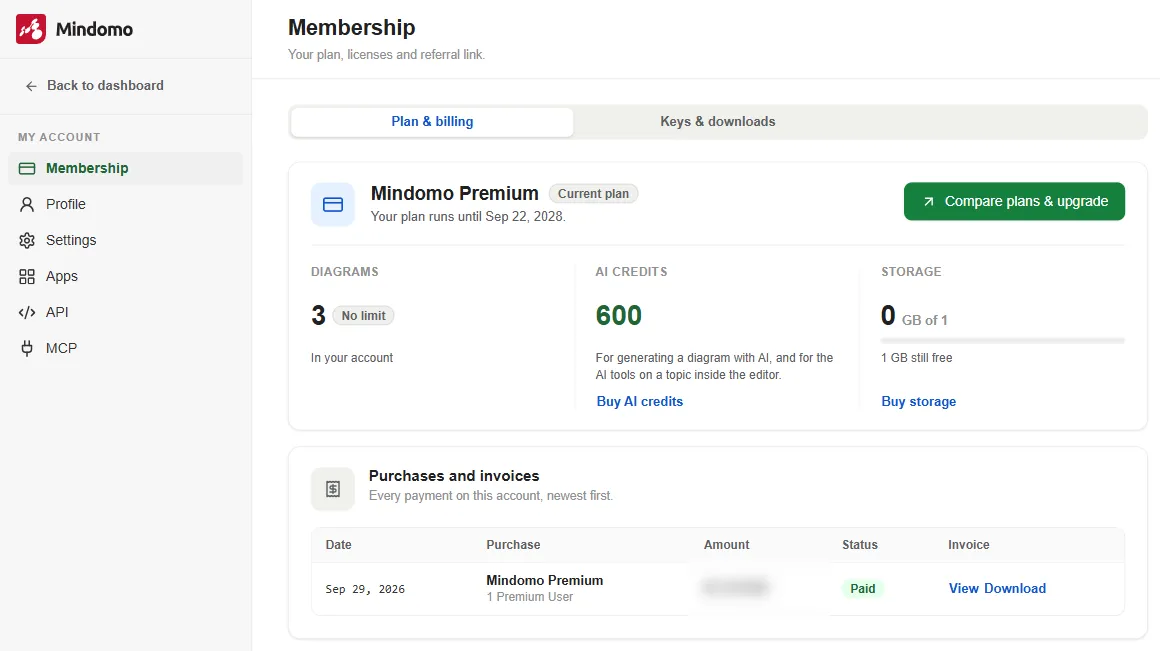
To extend your subscription or switch to a different plan, click Compare plans & upgrade and choose a plan on the pricing page.
Keys & downloads
Section titled “Keys & downloads”The Keys & downloads tab holds your license for the Mindomo Desktop app. There are two types of license: a subscription-based license, which comes with some cloud subscriptions and stays valid for as long as your subscription does, and a lifetime license, a one-time purchase of Mindomo Desktop Premium with support and updates included for the first year.
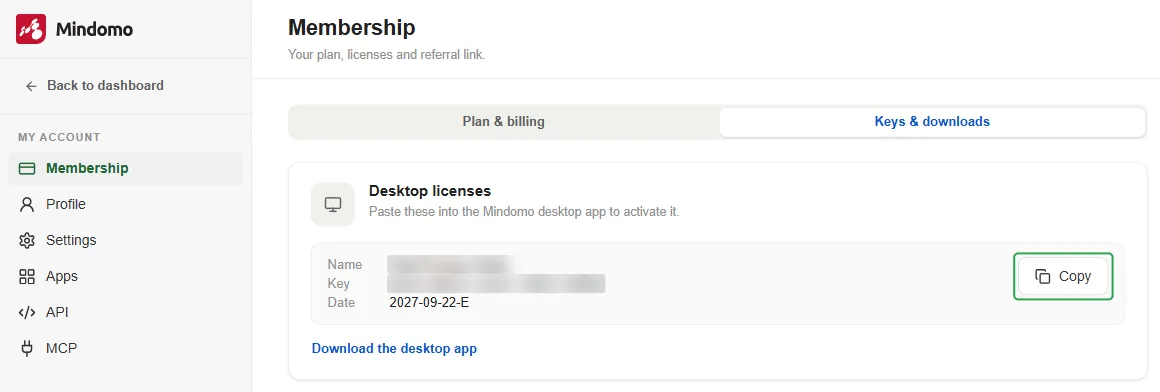
Each license has three parts:
- Name: the name the license is registered to.
- Key: your license key.
- Date: when the license expires. A subscription-based license ends in -E (for example,
2027-09-22-E), and a lifetime license ends in -U.
To activate Desktop Premium:
- If you haven’t installed the desktop app yet, click Download the desktop app.
- Click Copy to copy the license, rather than selecting it by hand.
- In the desktop app, open License Info, paste your license and click Validate.
For the full steps, see Activate a subscription-based license or Activate a lifetime license.
Profile
Section titled “Profile”Personal info
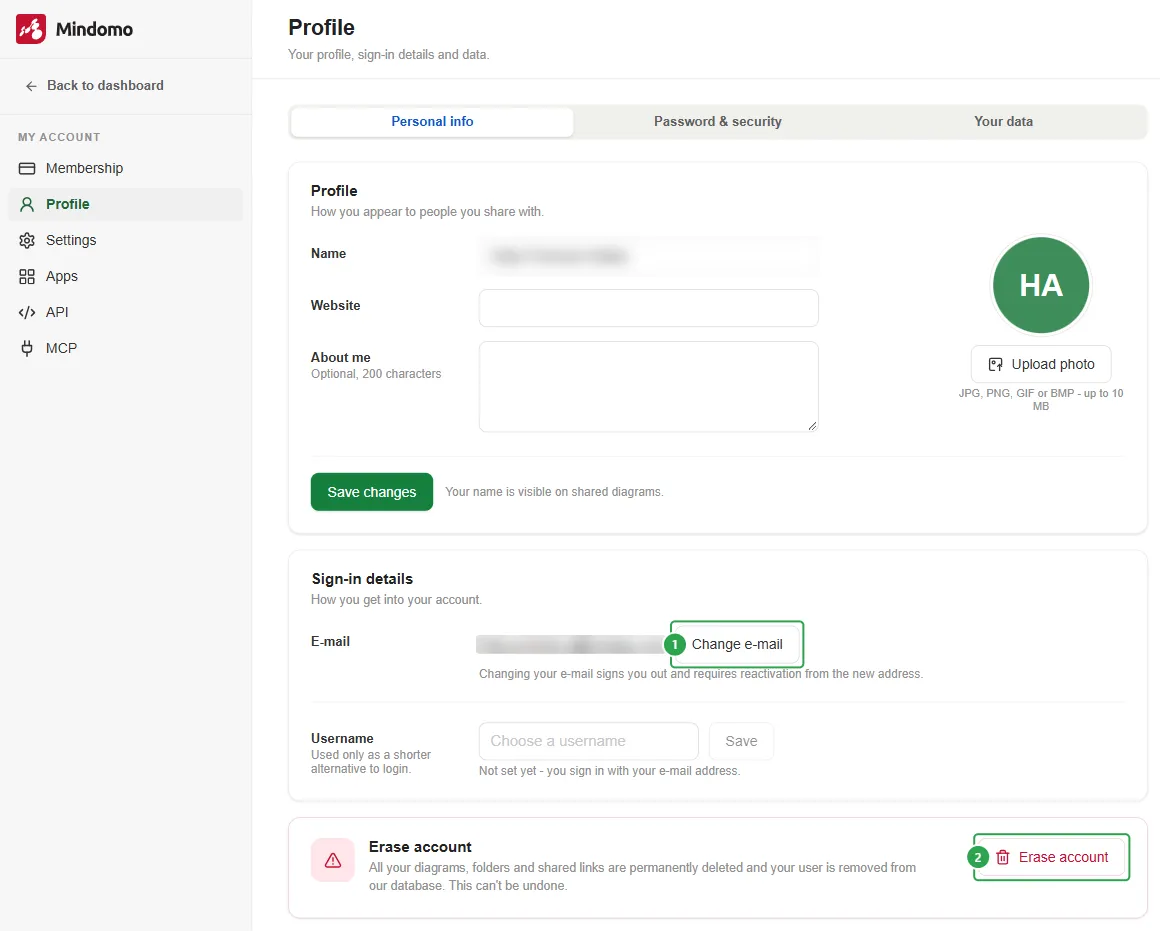
Section titled “Personal info”The Personal info tab holds your profile and your sign-in details:
- Profile: your Name, Website, and About me (optional, up to 200 characters). To add a photo, click Upload photo (JPG, PNG, GIF, or BMP, up to 10 MB). Click Save changes when you are done. Your name and photo are visible on shared diagrams.
- Sign-in details: your E-mail and your Username. The username is optional: you can use it as a shorter alternative to your e-mail address when you sign in. To set one, type it and click Save.
Change your e-mail
Section titled “Change your e-mail”To change your e-mail address, click Change e-mail (1) in Sign-in details. Mindomo asks you to confirm your password on a separate page: enter your current password and click Confirm. If you have forgotten it, use the Forgot your password? link on that page.
Erase your account
Section titled “Erase your account”To permanently delete your account, click Erase account (2) at the bottom of Personal info. Mindomo asks you to confirm: type ERASE in the box, then click Erase permanently. To keep your account, click Cancel.
Change your account type
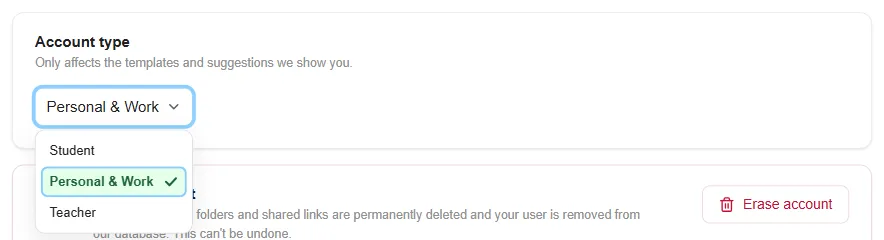
Section titled “Change your account type”You can change the account type you chose when you signed up. In Personal info, open the Account type dropdown and choose Student, Personal & Work, or Teacher. The account type only affects the templates and suggestions Mindomo shows you.
Password & security
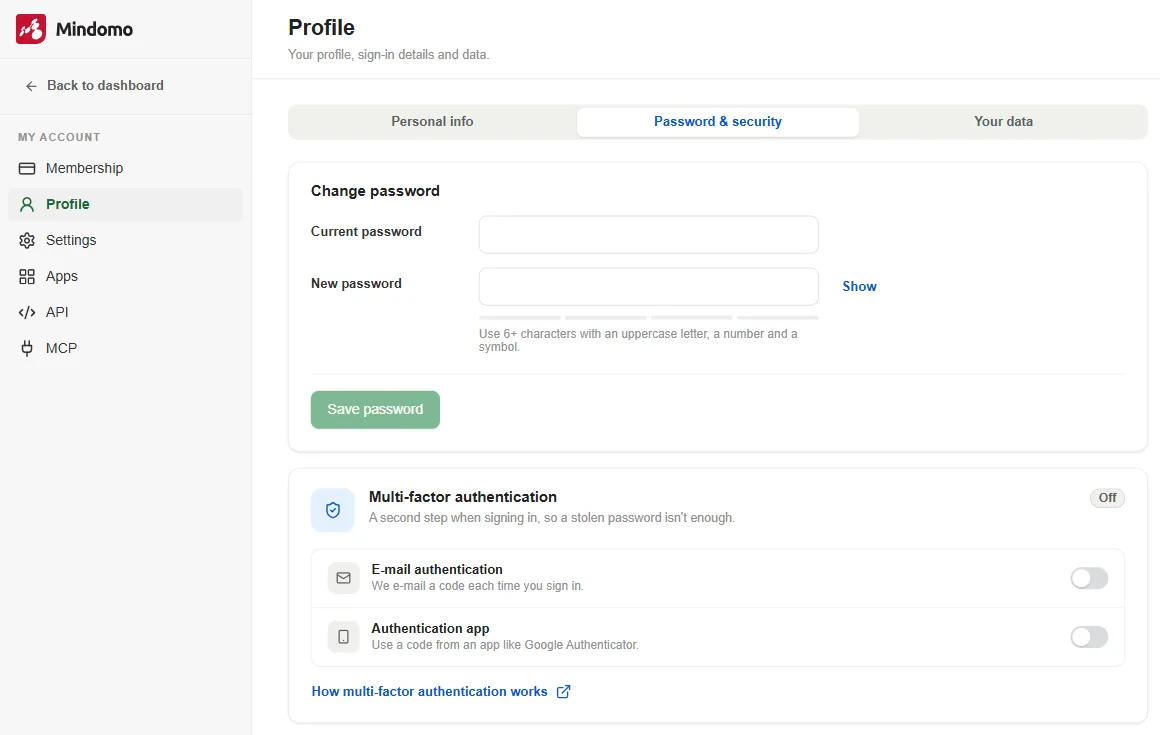
Section titled “Password & security”To change your password, open Password & security, enter your Current password and your New password, then click Save password. Click Show to see what you are typing. Use 6 or more characters, with an uppercase letter, a number, and a symbol.
If you have forgotten your password, or you signed up through a login provider and never set one, create a new password.
The same tab has Multi-factor authentication, which adds an extra security step when you sign in: after your password, you also enter a code. You can receive the code by E-mail authentication or from an Authentication app. To set it up, see Two-factor authentication.
Your data
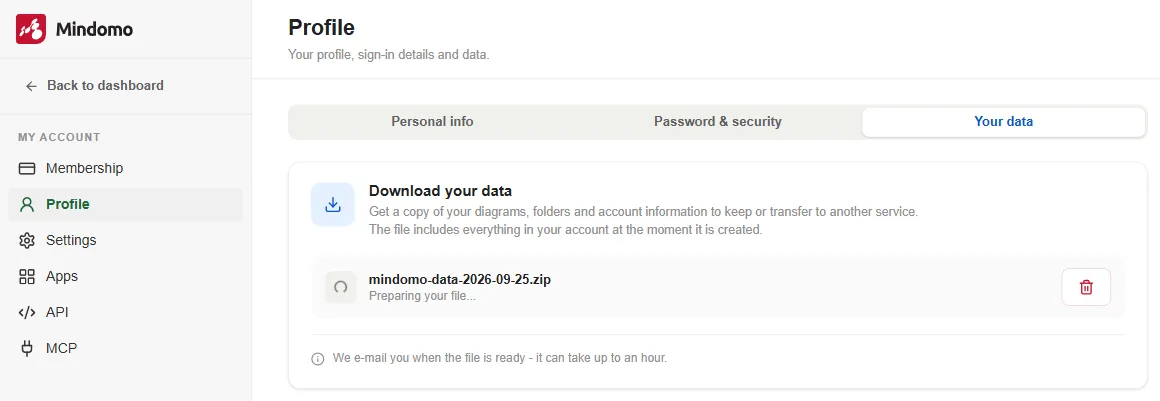
Section titled “Your data”To get a copy of your diagrams, folders, and account information, open Your data and click Create file. Mindomo e-mails you when the file is ready, which can take up to an hour. Unlike a backup, this file also includes your account information, so you can keep it or transfer it to another service.
While the file is being prepared, it is listed with its name and Preparing your file…. To remove it, click Delete (the bin icon) next to it.
Settings
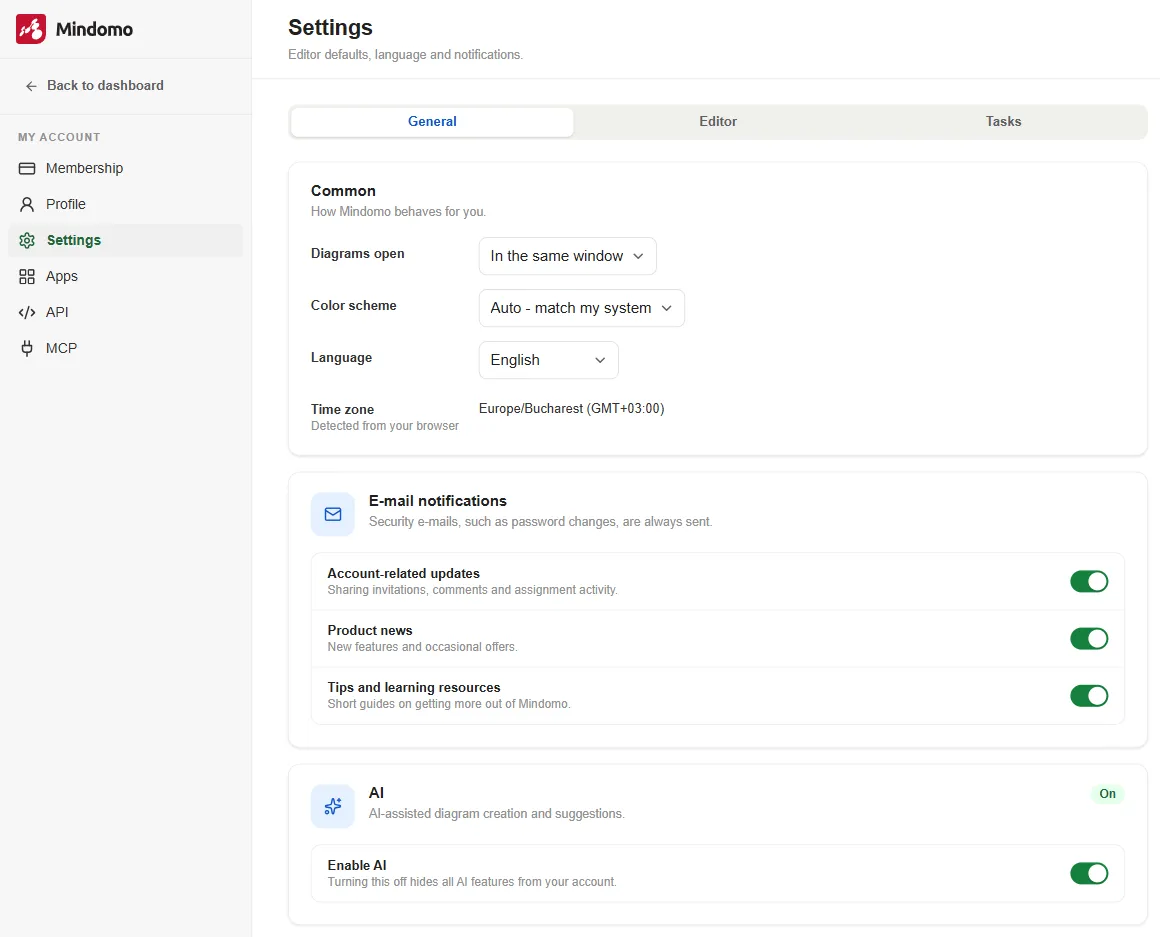
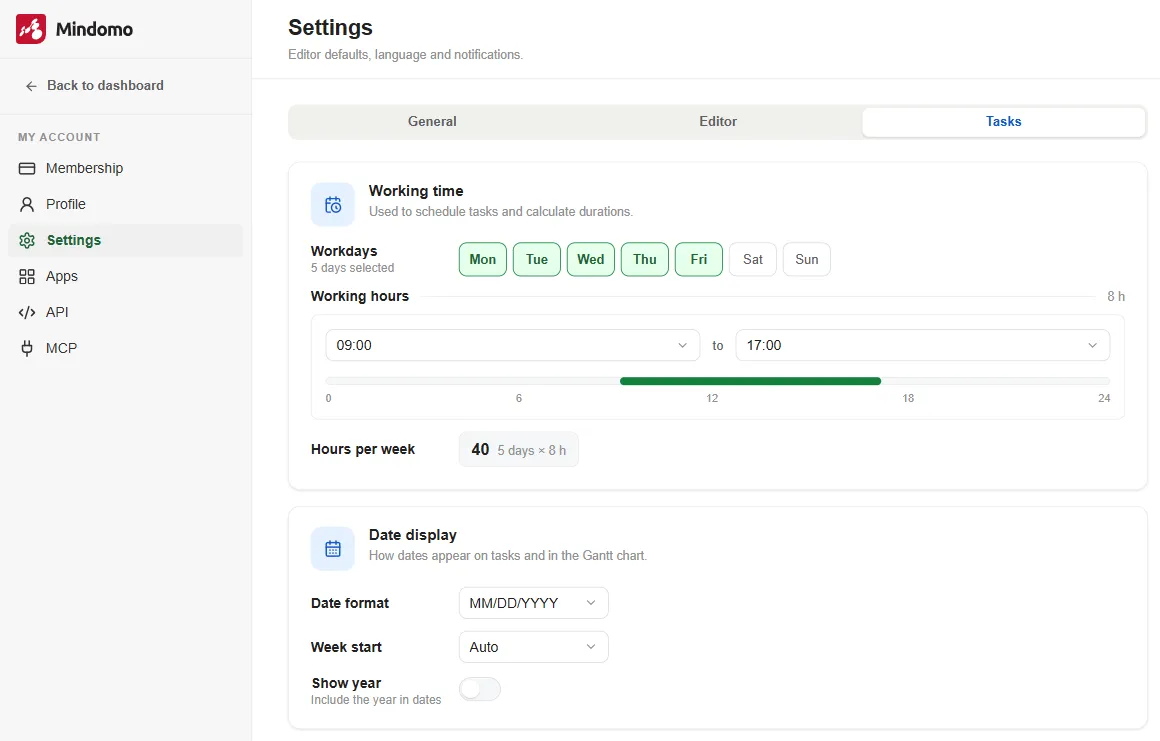
Section titled “Settings”The Settings section lets you choose how Mindomo looks and behaves. It has three tabs: General, Editor, and Tasks. With a Professional, Team, or Business subscription, there is also a Gantt tab.
General
Section titled “General”- Diagrams open: where your diagrams open: In the same window, In a new tab, or In a new popup.
- Color scheme: Auto - match my system, Light, or Dark.
- Language: the language of the Mindomo interface. You can choose from 19 languages, including English, Deutsch, Español, Français, Italiano, Português, 日本語, and 中文.
- Time zone: detected from your browser.
- E-mail notifications: turn Account-related updates, Product news, and Tips and learning resources on or off. Security e-mails, such as password changes, are always sent.
- AI: turning off Enable AI hides all AI features from your account. To learn what those features are, see Mindomo AI Features.
Editor
Section titled “Editor”The Editor tab decides how the diagram editor behaves for you, and which options new diagrams start with.
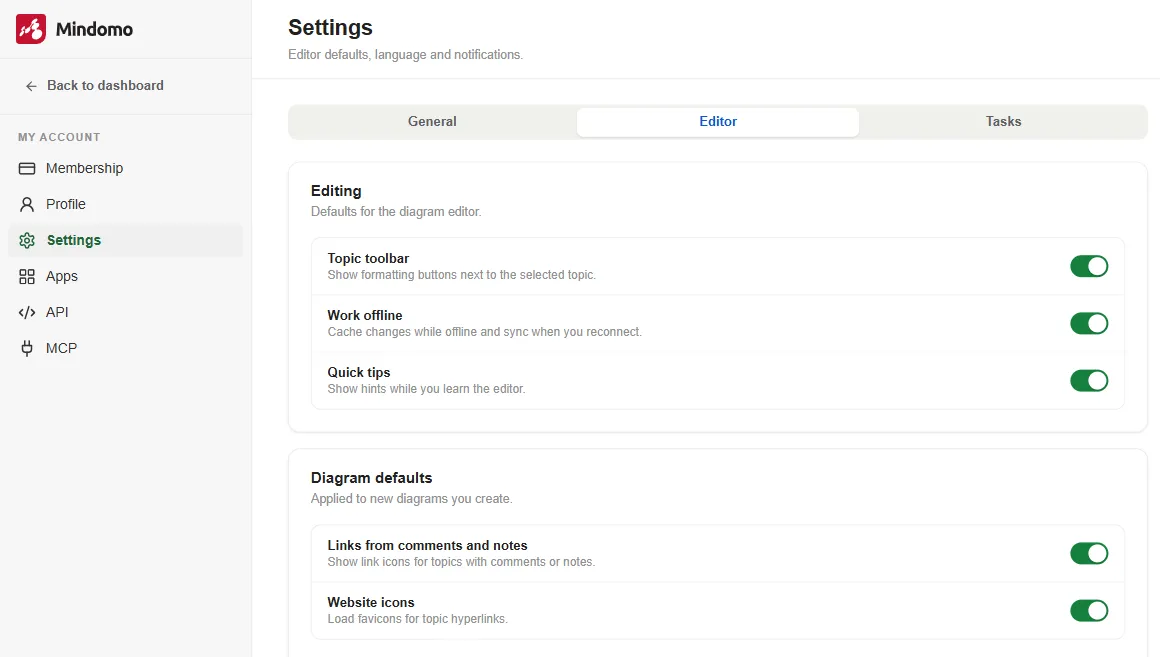
The Editing options apply to every diagram you open. If you turn off Topic toolbar, you can still reach the toolbar by right-clicking a topic or pressing Shift + F10.
Work offline caches your changes while you are offline and syncs them when you reconnect. To work fully offline, without a connection at all, use the Mindomo Desktop app.
The Diagram defaults are only a starting point: changing them doesn’t affect diagrams you already have. To change these options for one diagram, use its Advanced Settings.
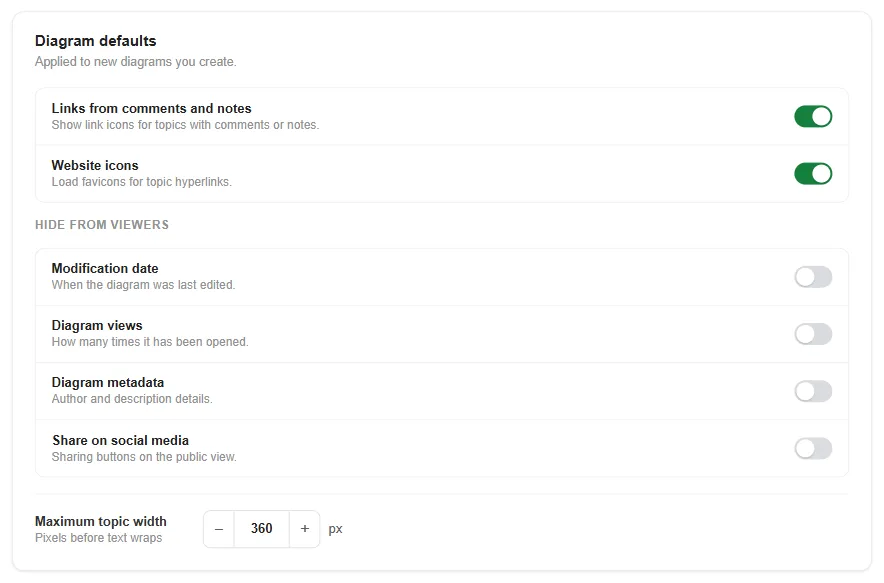
The Hide from viewers options control what people see when you share a diagram as view-only, for example whether they can see when it was last edited or how many times it has been viewed. Turning off Website icons can improve performance and privacy, because Mindomo no longer loads icons from the linked sites.
With a Professional, Team, or Business subscription, the Gantt tab sets how your Gantt charts look. Working time is the same setting as on the Tasks tab.
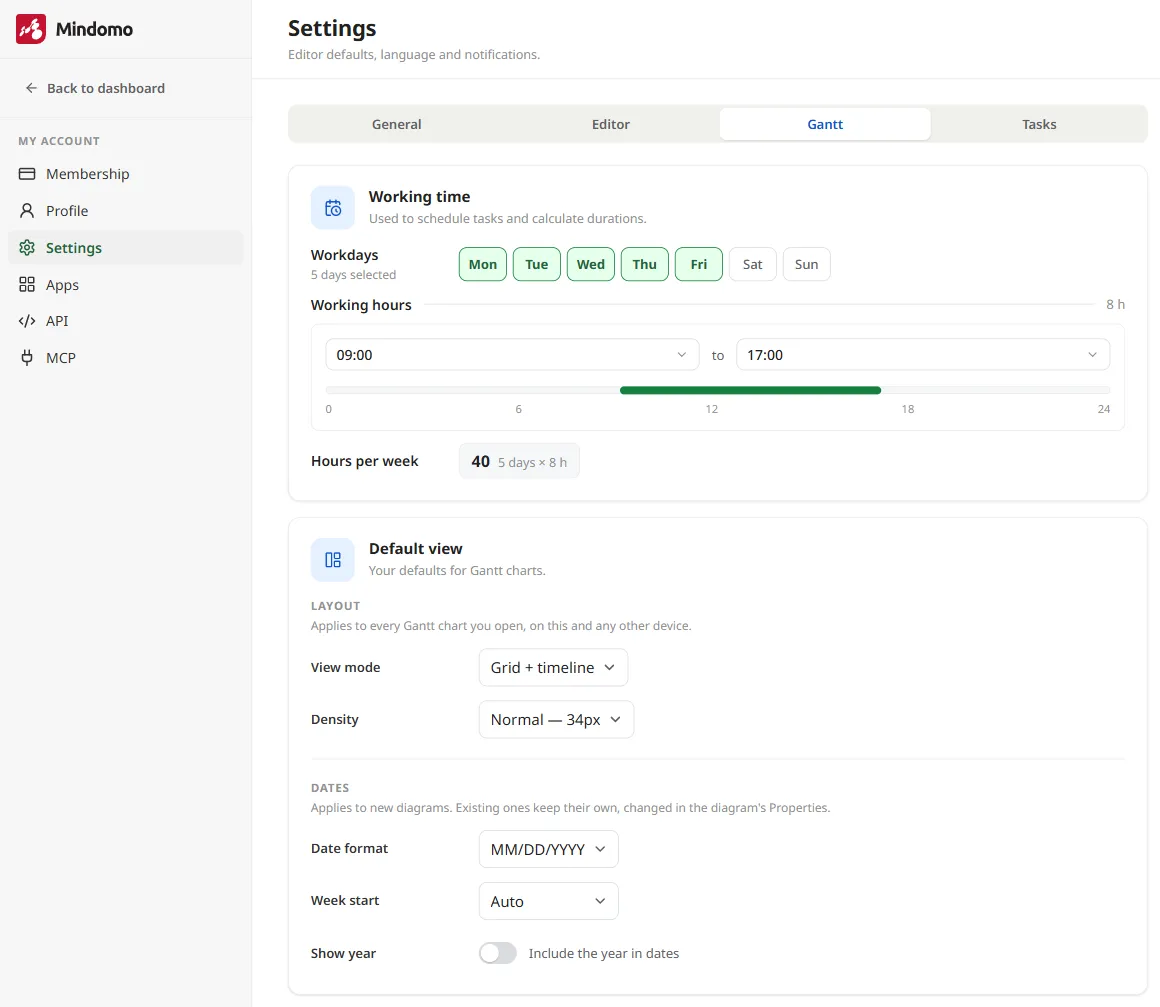
In Default view, the Layout options apply to every Gantt chart you open, on any device. The Dates options apply to new diagrams only; existing ones keep their own, which you change in the diagram’s properties.
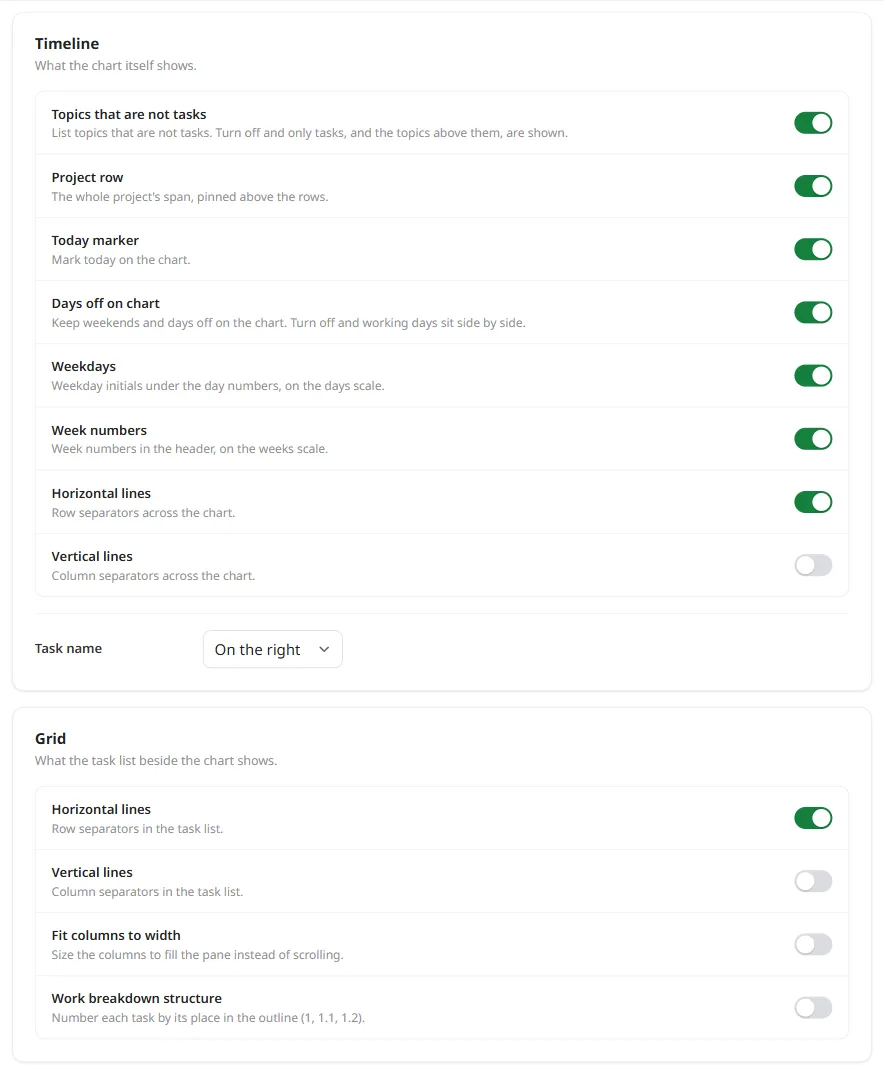
Timeline and Grid choose what the chart and the task list show. For example, turn off Days off on chart to remove the gaps for weekends, or turn on Work breakdown structure to number tasks by their place in the outline (1, 1.1, 1.2).
- Working time: your Workdays, Working hours, and Hours per week, used to schedule tasks and calculate durations.
- Date display: the Date format, the Week start, and whether to Show year in dates on tasks and in the Gantt chart.
For more on tasks, see Task Management.
Login providers
Section titled “Login providers”After creating your Mindomo account, you can connect login providers to sign in with one click. To connect one:
- Open Apps > Login providers.
- Click Connect next to the provider you want: Gmail, Facebook, Apple, Yahoo, Office 365, Microsoft, Clever, Skolon, or SAML SSO.
You can connect several providers at the same time, and any connected provider can sign you in to your Mindomo account. You can also change their settings at any time.
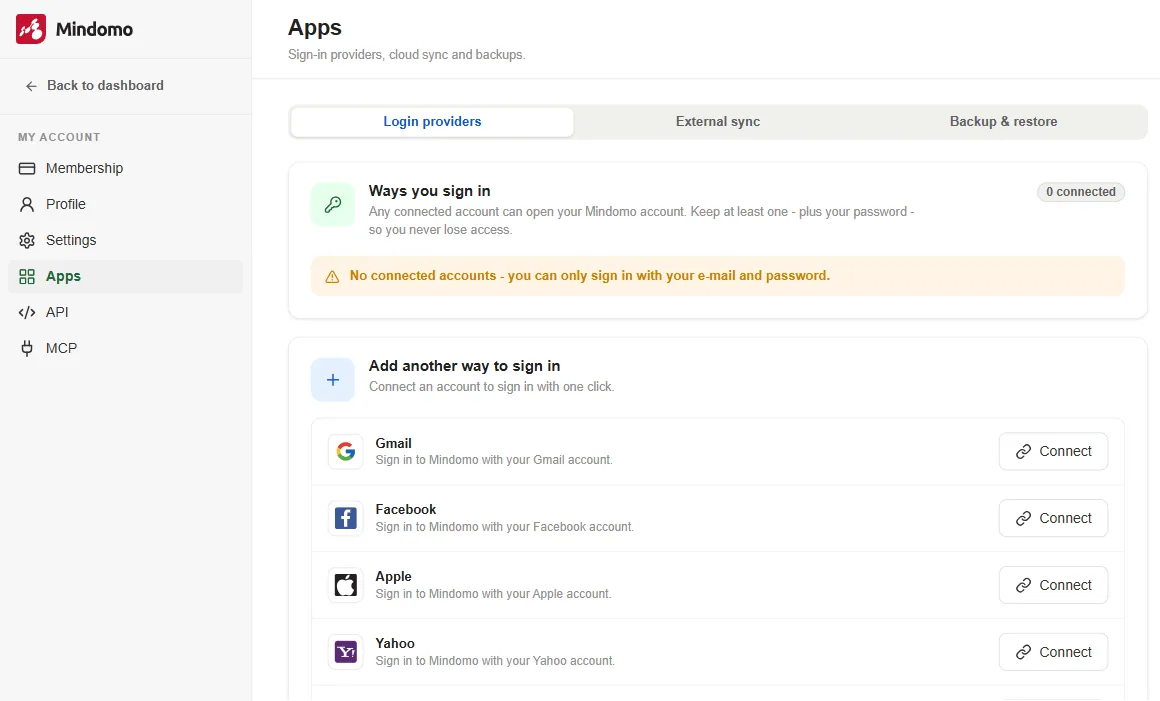
The same login provider e-mail can only be linked to one Mindomo account. If you have several accounts, you cannot connect them all using the same provider address.
External sync
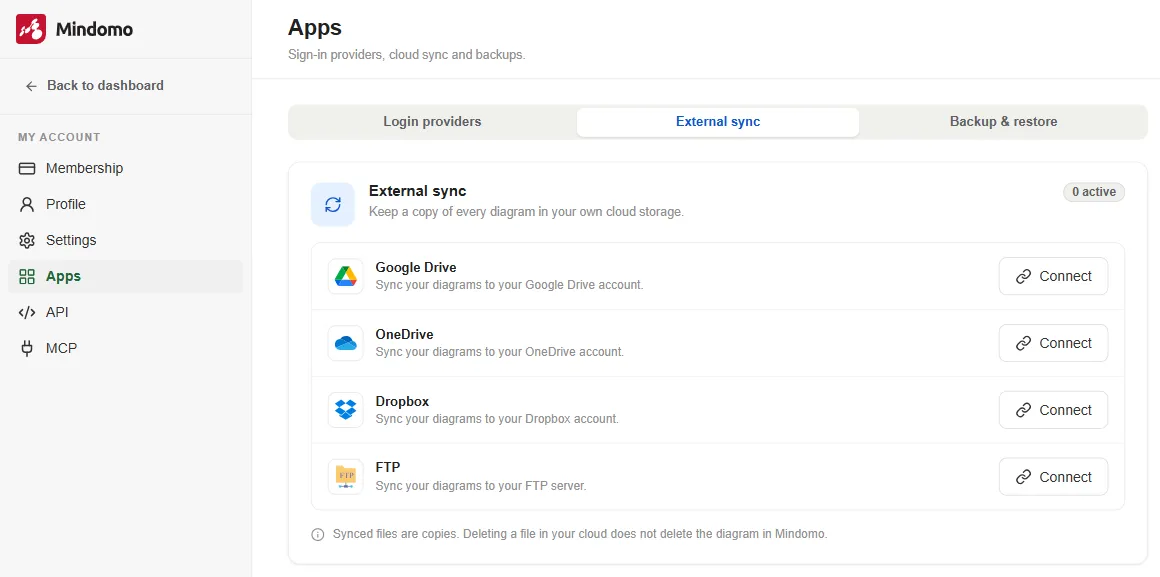
Section titled “External sync”To keep a copy of every diagram in your own cloud storage, open External sync and click Connect next to Google Drive, OneDrive, Dropbox, or FTP. You are asked to give Mindomo access to that account, and your diagrams are then backed up there automatically. The badge at the top of the card shows how many services are connected. Synced files are copies: deleting a file in your cloud does not delete the diagram in Mindomo.
Backup & restore
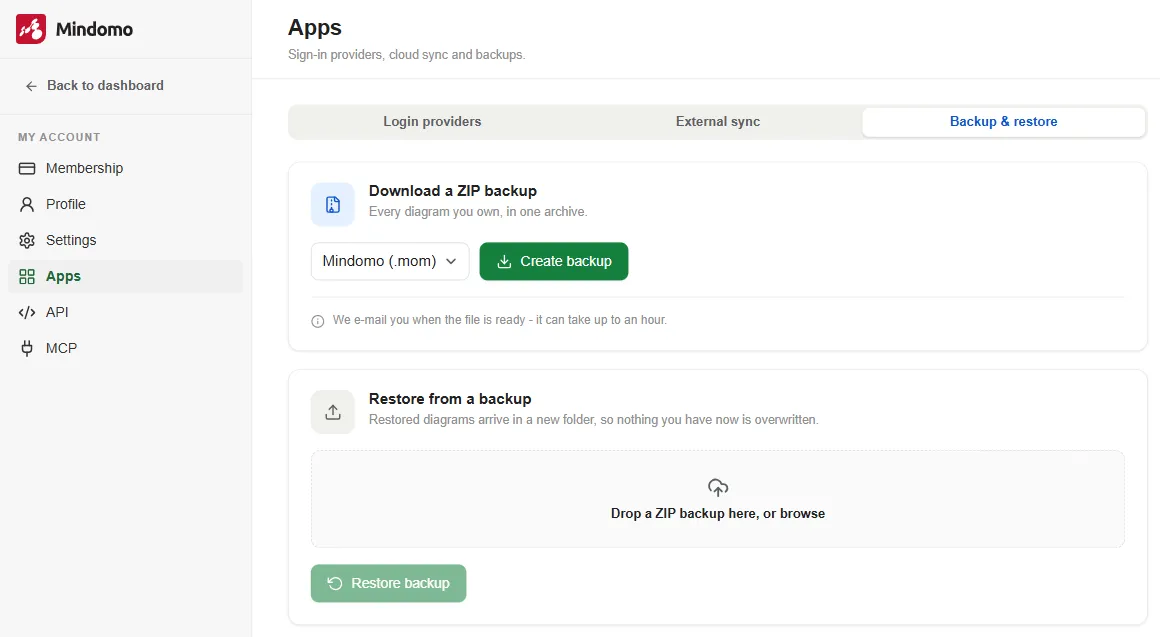
Section titled “Backup & restore”To download every diagram you own in one archive, open Backup & restore and click Create backup under Download a ZIP backup. The diagrams are saved in the Mindomo (.mom) format, and Mindomo e-mails you when the file is ready, which can take up to an hour.
To restore a backup, drop the ZIP file under Restore from a backup (or browse for it), then click Restore backup. Restored diagrams arrive in a new folder, so nothing you have now is overwritten.
The API section is where you create access tokens for the Mindomo API, which lets your own scripts and integrations create, edit, search, and export diagrams. API access requires a paid plan.
To create a token, click New token (1) and choose its scopes, which decide what the token is allowed to do. Give each script or integration its own token, so revoking one breaks nothing else.
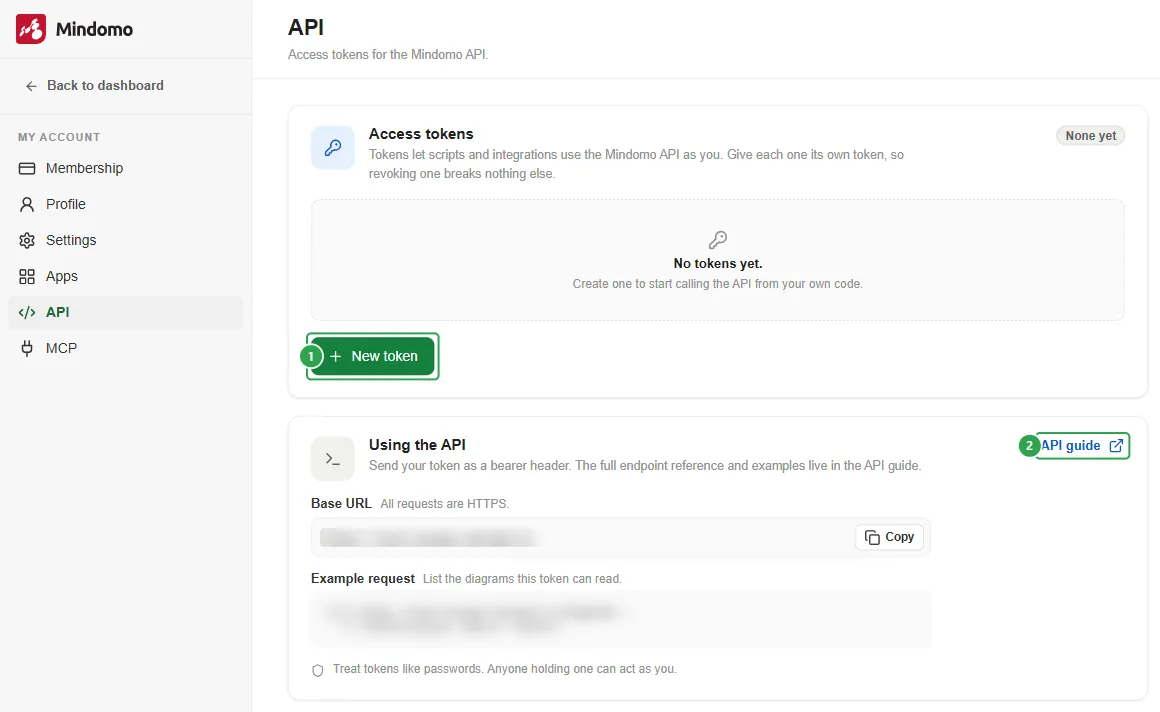
The Using the API card shows the Base URL your code sends requests to, with a Copy button, and an example request. For the full reference and more examples, click API guide (2).
The Usage card shows your requests against the limits for the last 5 minutes, this hour, today, and this month. The API and MCP share the same limits.
The MCP (Model Context Protocol) section connects AI assistants such as ChatGPT and Claude to your diagrams. To connect one, click Copy (1) next to the Server URL and paste it into your assistant’s MCP settings. The assistant then asks you to sign in to Mindomo and approve its access. Connected assistants are listed under Connected apps, where you can remove them at any time.
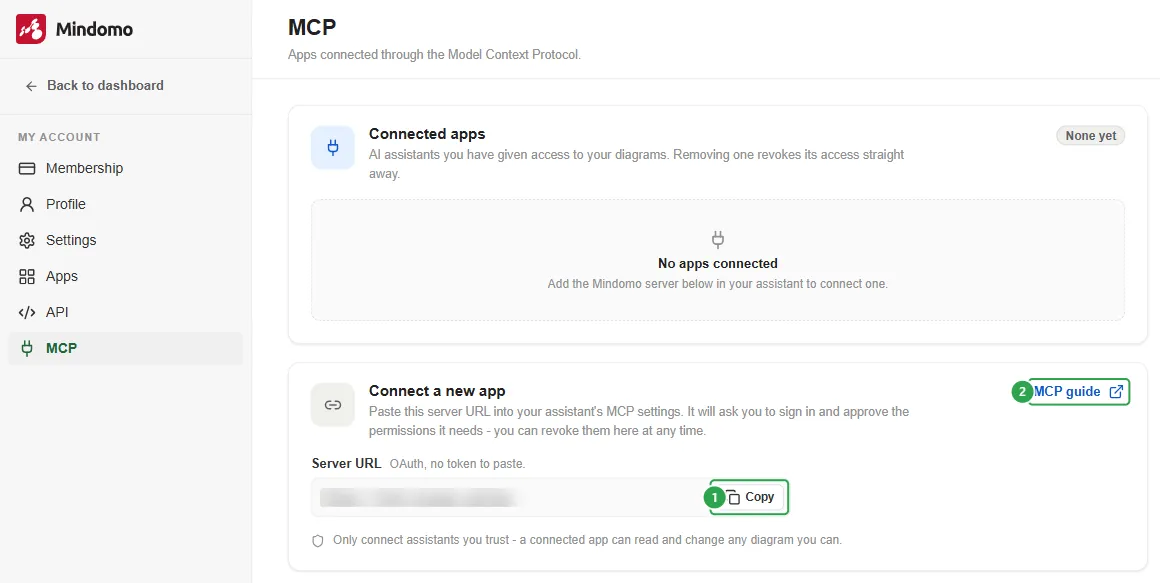
Before you connect, read the MCP guide (2). It explains the permissions an assistant asks for, which features need a paid plan, and every tool an assistant can use to read, search, create, edit, style, and export your diagrams. For setup steps for a specific assistant, such as Claude, ChatGPT, or Cursor, see Mindomo MCP.