

School administration
School administration is available on School-tier licenses and lets one or more admins manage everyone on the license: adding and removing teachers and students, buying licenses, AI credits and storage, and configuring how people join the school.
Each school license has one school owner, by default the person who originally purchased the license. The owner holds full rights over the school and, unlike other members, can’t be removed from it.
The owner can add or remove members, add multiple other admins for easier management, and personalize the school’s settings. To change ownership, contact support@mindomo.com.
School admin panel
Section titled “School admin panel”The panel groups everything school-wide into three tabs (Users, License, and Settings): adding and removing people, managing licenses, AI credits and storage, and configuring how the school works.
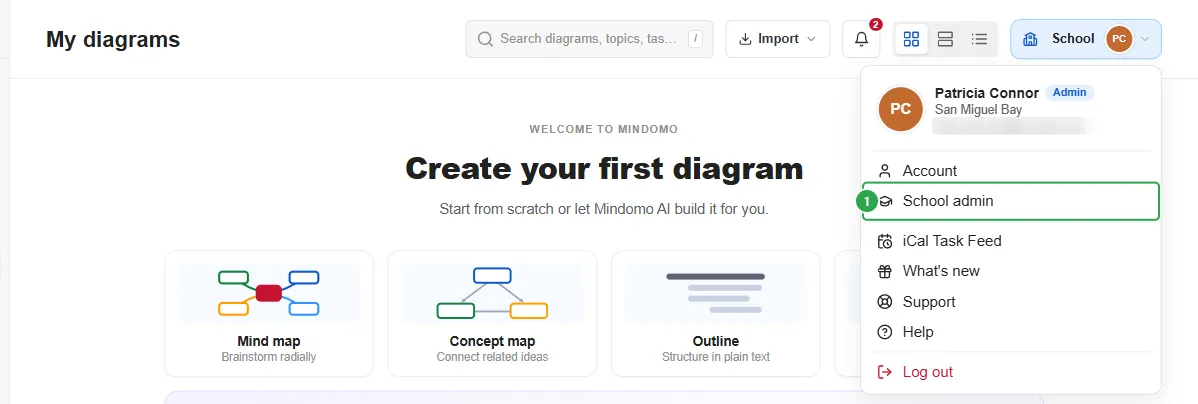
Click the account switcher in the top-right corner (your avatar and organization name), then select School admin (1).
Manage license users
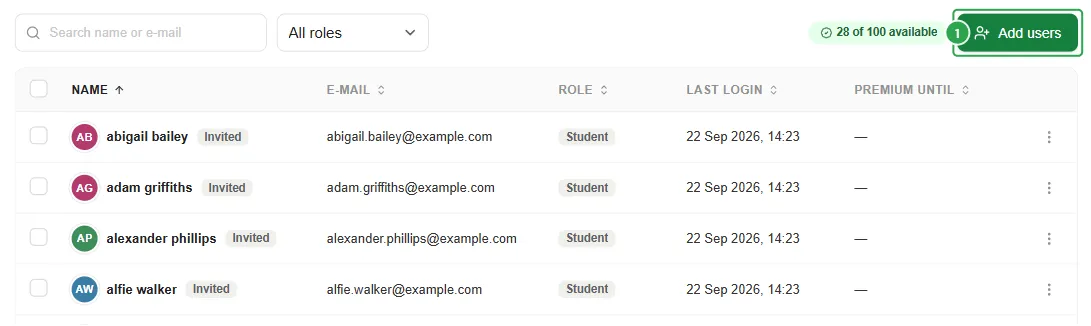
Section titled “Manage license users”On the Users tab, click Add users (1) to open a panel with two ways to add teachers and students.
Invite users by email
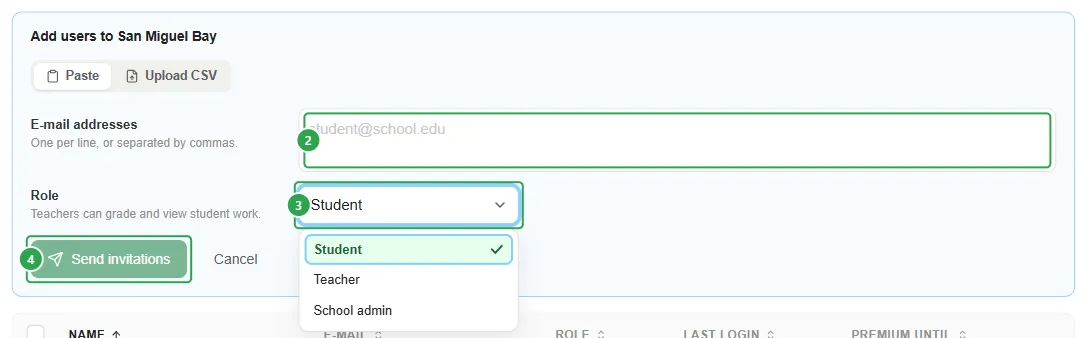
Section titled “Invite users by email”On the Paste tab, you can paste users’ e-mail addresses (2) into the E-mail addresses field, one per line or separated by commas. Set the Role dropdown (3) to Student, Teacher, or School admin for the whole batch, then click Send invitations (4).
Invite users by CSV import
Section titled “Invite users by CSV import”The Upload CSV tab is an easier way to invite many people at once than pasting addresses one by one.
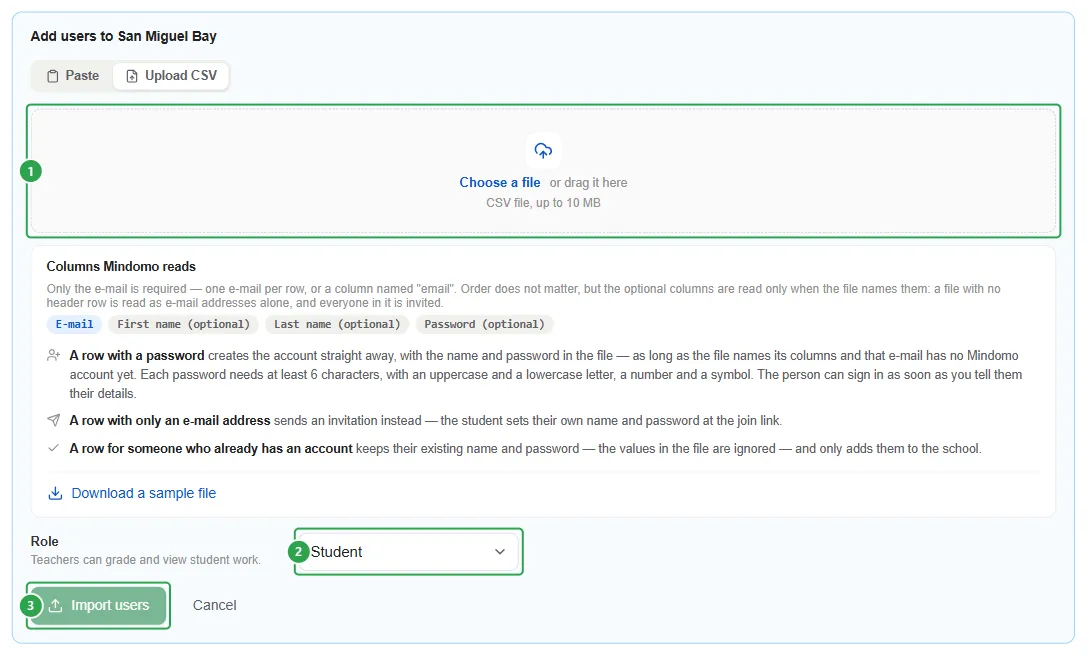
Click Download a sample file first to get a template with the right headers, then fill it in and upload it. The file can be up to 10 MB, and only e-mail is required; you can also add optional First name, Last name, and Password columns.
To import: choose a file (1), set the Role dropdown (2) for the whole file, then click Import users (3).
What happens next depends on the row. An e-mail with a password creates the account right away. An e-mail alone sends an invitation. An e-mail that already has an account just gets added to the school.
Once someone accepts, their row on the Users tab loses the Invited badge and picks up a Last login date, and Premium until now shows the date their premium access runs out instead of staying empty.

The invited person’s side
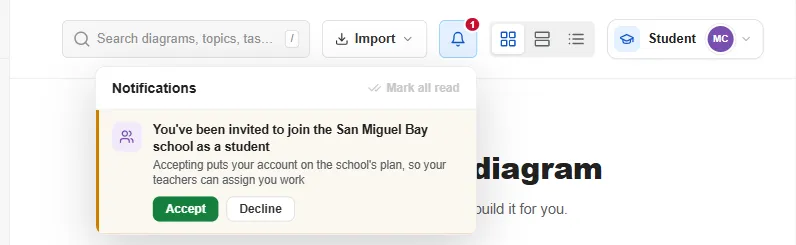
Section titled “The invited person’s side”Whether they were added by pasted addresses or by CSV import, the invited teacher or student receives the invitation by e-mail, with a Join link, and also sees it as a notification on their own dashboard, with Accept and Decline buttons.
Accepting is what actually onboards them, putting their account on the school’s plan; being invited alone isn’t enough.
-
If they don’t yet have a Mindomo account, the Join link takes them through account creation first, either with an e-mail address and password or through one of the available sign-in options, after which they’re added to the school automatically.
-
If they already have a Mindomo account, we recommend they log in to that account first and only then open the Join link from the invitation e-mail. Otherwise they may be sent to the account creation page again.
Updating and removing users
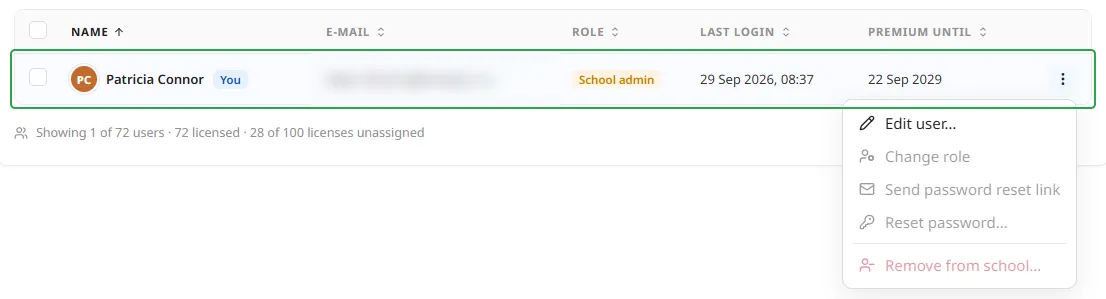
Section titled “Updating and removing users”To change one user’s details, role, or membership in the school, open the ⋯ menu at the end of their row. On an account that is fully set up, all five actions are available:
- Edit user changes their name and their role together, in one dialog.
- Change role switches them between Student, Teacher, and School admin straight from the submenu, without opening a dialog.
- Send password reset link e-mails them a link so they pick their own new password. Whenever they can reach their school mailbox this is the safer route, because you never handle the password yourself.
- Reset password is for someone who cannot get to their mailbox: you set the password yourself and pass it on to them in person, since Mindomo never e-mails a password. Click Generate if you would rather not invent one: the dialog creates a password for you, shows it so you can copy it and share it with the user, and once you click Set password it takes effect immediately and always signs them out of every device they are currently signed in on.
- Remove from school takes them off the license and frees it, and asks what should happen to the diagrams they own: leave the work with them (their account keeps working, but loses the school premium), move the work into your own account (the usual end-of-year route), or delete the account and all its work permanently.
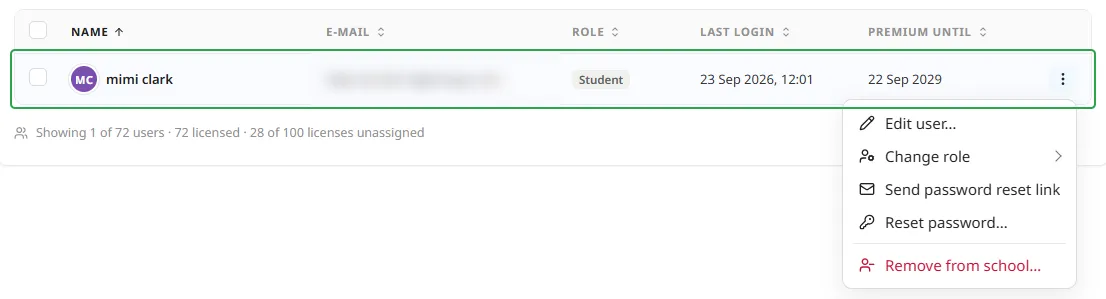
Not every action is always available, though. A row that is still just an invitation is tagged Invited and has no Premium until date yet, because nobody has accepted it: there is no account to edit, no role to change, and no password to reset.
So on those rows Remove from school is the only action enabled, and it withdraws the invitation. The other four switch on as soon as that person accepts and signs in.
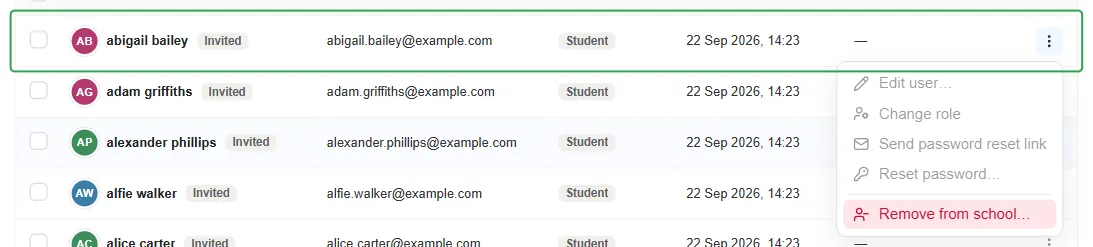
As an admin, find your own row marked You. The only option you can use for your own account is Edit user, and you can only edit your name.
If you need to change anything else, ask another school admin. They can access all five options for your account and make the changes for you.
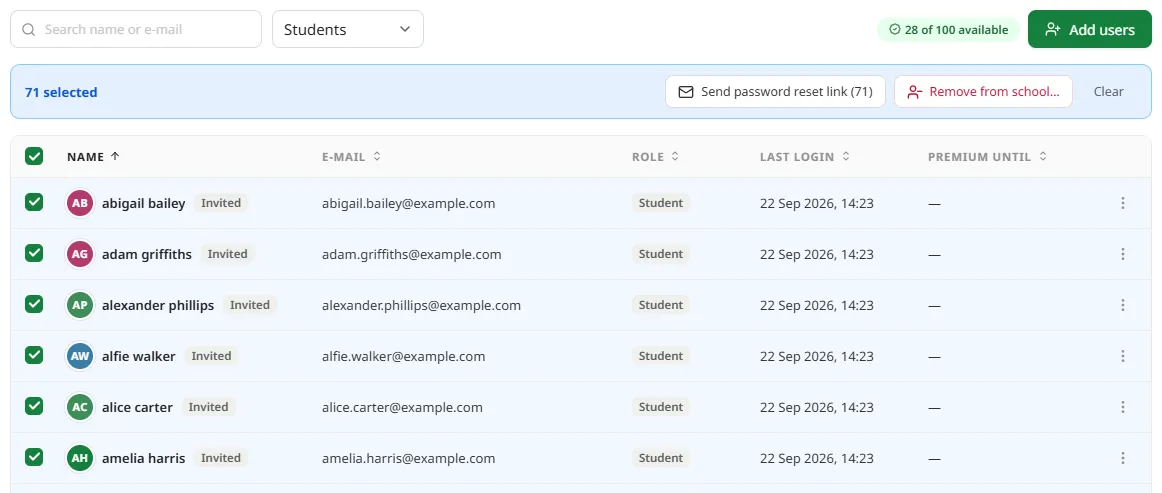
To act on several accounts at once, check their boxes, or tick the box in the header row to select everyone currently listed.
A bulk action bar then appears above the list, with Send password reset link, Remove from school, and Clear, which cancels the selection and closes the bar without changing anything.
Searching, filtering, and exporting users
Section titled “Searching, filtering, and exporting users”Use the search box to find someone by name or e-mail, or the role dropdown to filter the list to All roles, School admins, Teachers, or Students. The two work together, so you can search within a single role.

A summary line and an Export CSV link sit at the bottom of the list.
The summary counts three different things: the number of people invited to the school, how many of them hold a license, and the number of licenses still available to hand out.
Export CSV downloads the list as a spreadsheet, with one row per user and the same five columns as the table: name, e-mail, role, last login, and premium until. It exports exactly the rows on screen, so filter first if you want a subset.

License details, AI credits, and storage
Section titled “License details, AI credits, and storage”Switch to the License tab for everything about the term, the licenses on it, AI credits, storage, and past purchases.
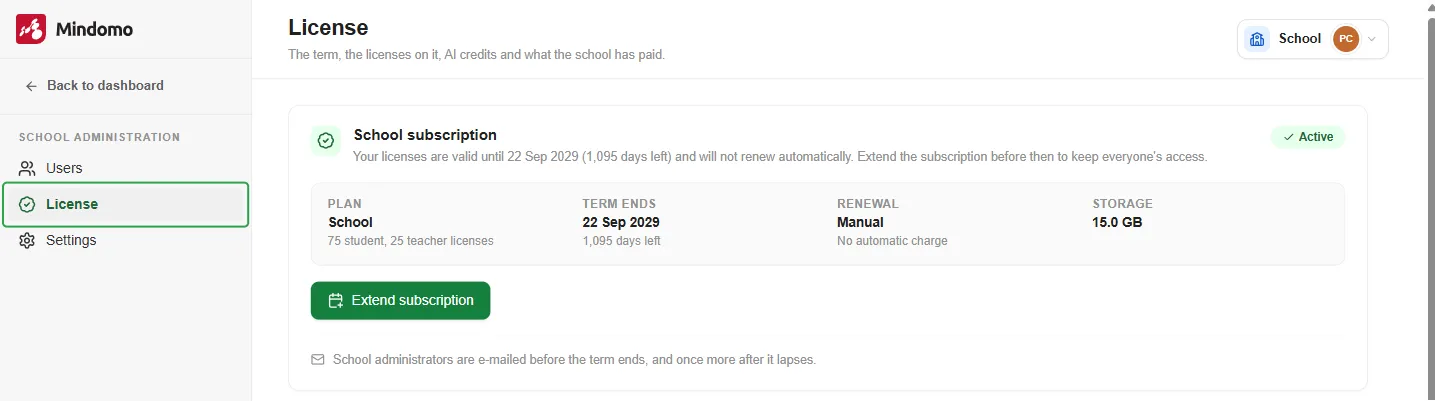
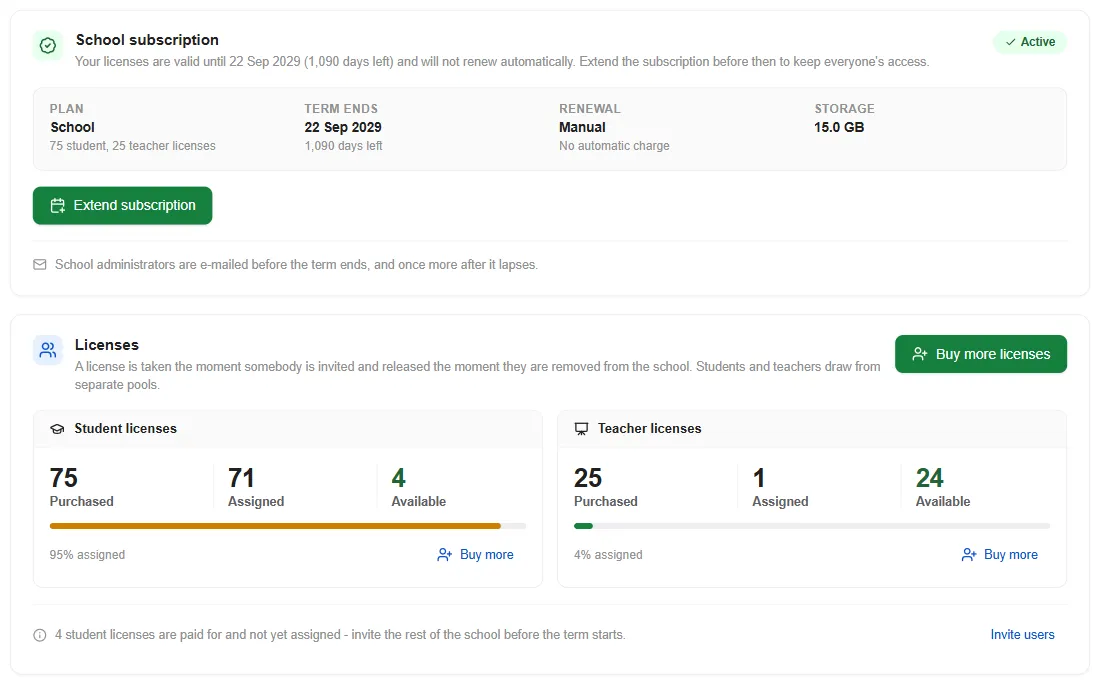
The School subscription card shows the plan, term end date and days left, renewal mode, and storage allowance, with an Extend subscription link. If any licenses were bought for a shorter term than the rest of the school, a banner offers to move them to match the main term.
The Licenses card below it tracks student and teacher licenses in separate pools (a license is taken the moment someone is invited and released when they’re removed), each with a usage bar and its own Buy more link.
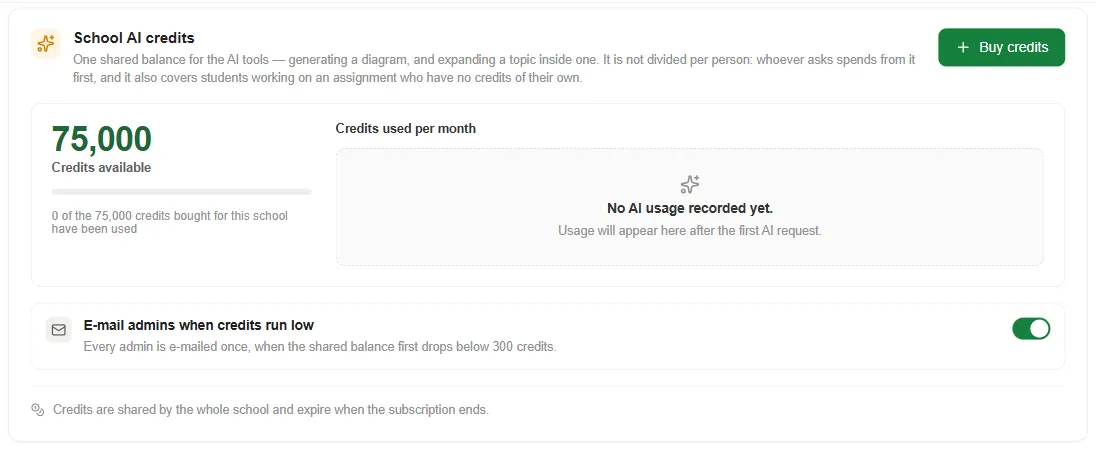
School AI credits is one balance shared by the whole school for AI diagram generation and topic expansion, used first-come-first-served by staff and students alike.
The card shows how many credits are left, a Buy credits link to add more, and a chart of how many were used each month.
Turn on E-mail admins when credits run low and every school admin gets one e-mail, the first time the balance drops below 300 credits.
Credits expire when the school’s subscription ends.
Who spends from that balance is decided class by class, not here: each class’s AI tools tab has a switch for whether students may use AI in that class’s work, and a student with no credits of their own falls back on the school’s shared pool. See AI tools in Classes.
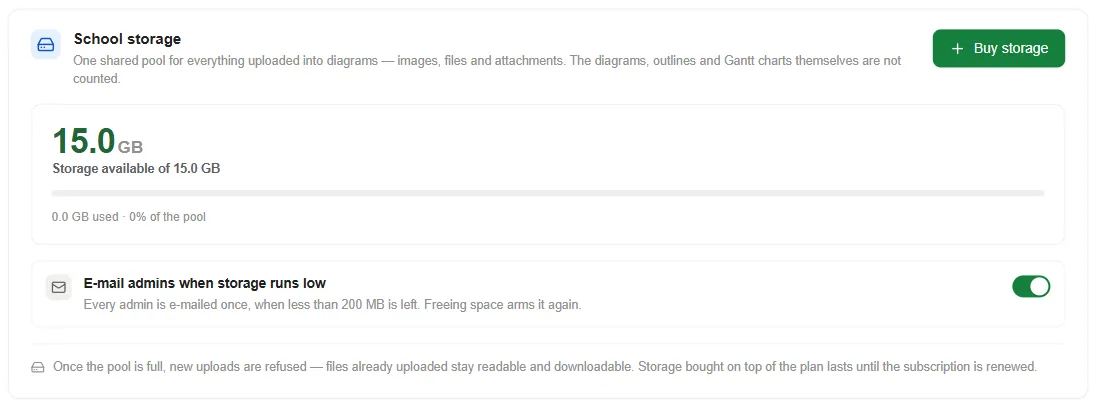
School storage is a similar shared pool, but for files and images uploaded into diagrams; diagrams, outlines and Gantt charts themselves don’t count against it.
A Buy storage link and an E-mail admins when storage runs low toggle (fires once under 200 MB) work the same way as the AI credits card.
Purchases and invoices lists past charges to the school, each tied to a purchase order; it’s empty until the school makes its first purchase.
School settings
Section titled “School settings”The Settings tab covers the school’s profile, how people join, the LTI integration, and what students and staff can do or receive.
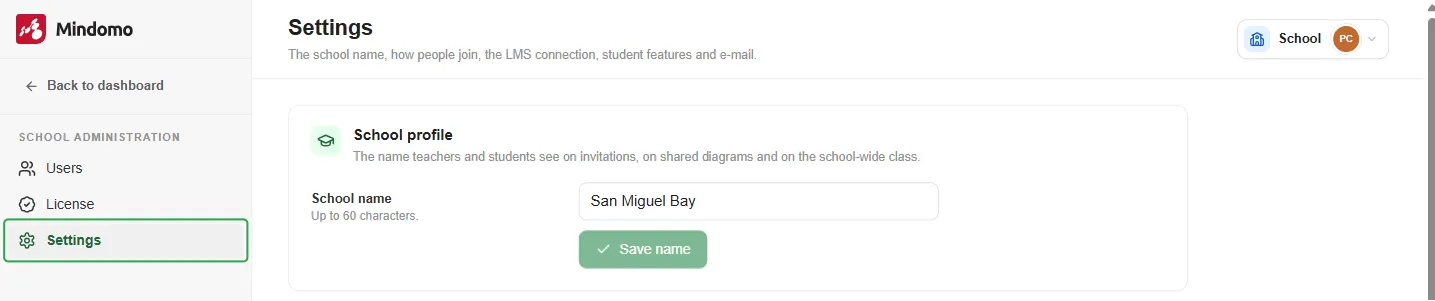
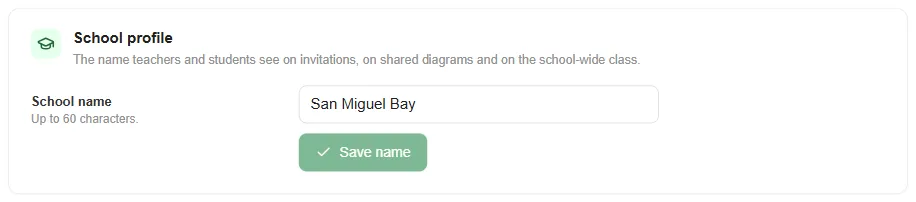
School profile lets you set the school name (up to 60 characters) used on invitations, shared diagrams, and the school-wide class.
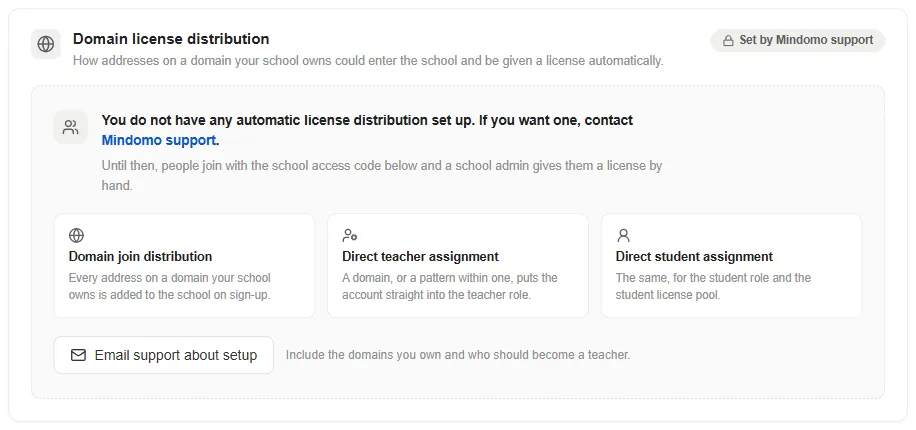
Domain license distribution automatically enrolls anyone who signs up with an e-mail address on a domain the school owns.
Only Mindomo Support can turn it on, not you. Click Email support about setup and say which domains you own and who should join as a teacher. Until it’s in place, people join with the school access code below.
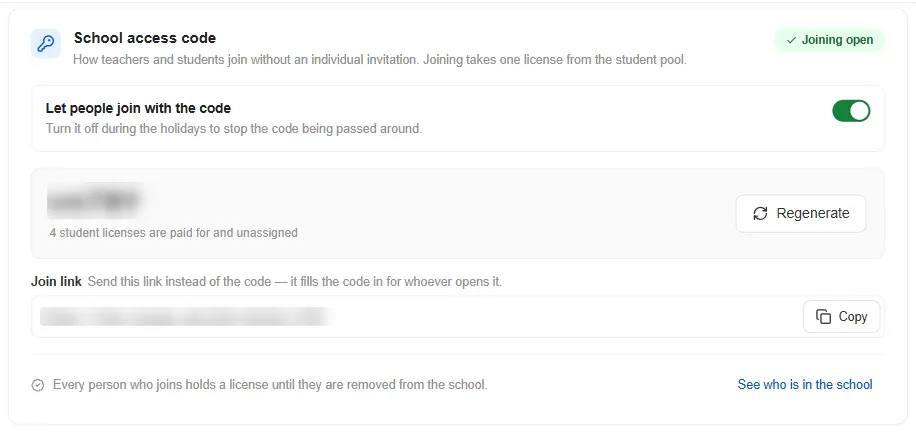
School access code replaces sending individual invitations: it shows the code, a Regenerate button, a toggle to open or close joining by code, and a copyable join link.
Joining this way still takes one license from the student pool.
LMS integration (LTI) surfaces the consumer key, shared secret, and launch URL needed to connect Moodle, Canvas, Blackboard, or Google Classroom as an external tool, plus a Rotate secret button. See LTI integrations for the full setup.
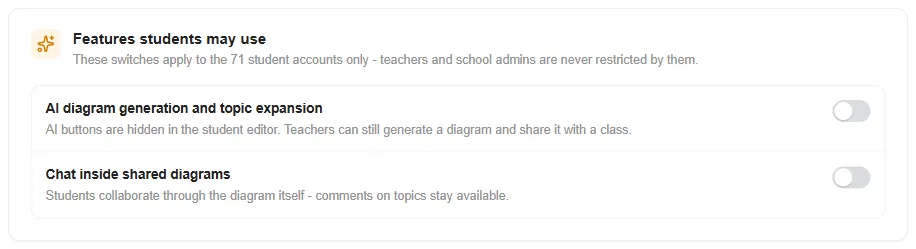
Features students may use has two toggles, AI diagram generation and topic expansion and Chat inside shared diagrams, that apply to student accounts only; teachers and school admins are never restricted by them.
The E-mails Mindomo may send card separates optional subscribe/unsubscribe switches (product news and tips e-mails) for teachers/admins and for students.
Account e-mails (invitations, password resets, expiring licenses) are always sent regardless, and students recorded as under 16 never receive either optional e-mail.
Classes in your school
Section titled “Classes in your school”Being on the school license and being in a class are two different things. The license gives someone a premium account under the school; a class is the group a teacher gives assignments to, and joining the school does not put a student in one.
Teachers build their own classes from Classes in the dashboard sidebar. Each class has its own roster, a join code students use to get in, and the assignments given to that group.
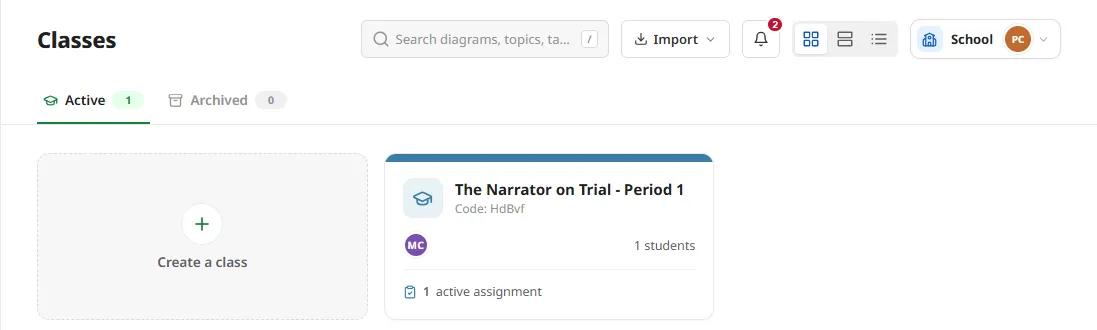
The school name you set under School profile is what students see on the school-wide class, so it is worth setting before teachers start building their rosters.
For the full picture, see Classes, which covers creating a class, managing the roster and co-teachers, and archiving. Adding students covers the ways to fill a roster, and Joining a class is the student’s side of it.
Templates for your school
Section titled “Templates for your school”Turn any diagram into a template that every teacher and student in the school can reuse. The school gets its own category in the template browser, named after the school, and anything you put there shows up for everyone on the license.
-
Create and personalize a diagram: apply a theme (or create your own in your school’s colors), set a layout, and add the starting topics you want every copy to begin from. For something more structured, build a fillable template instead, with input topics and suggested text, icons, and images to choose from.
-
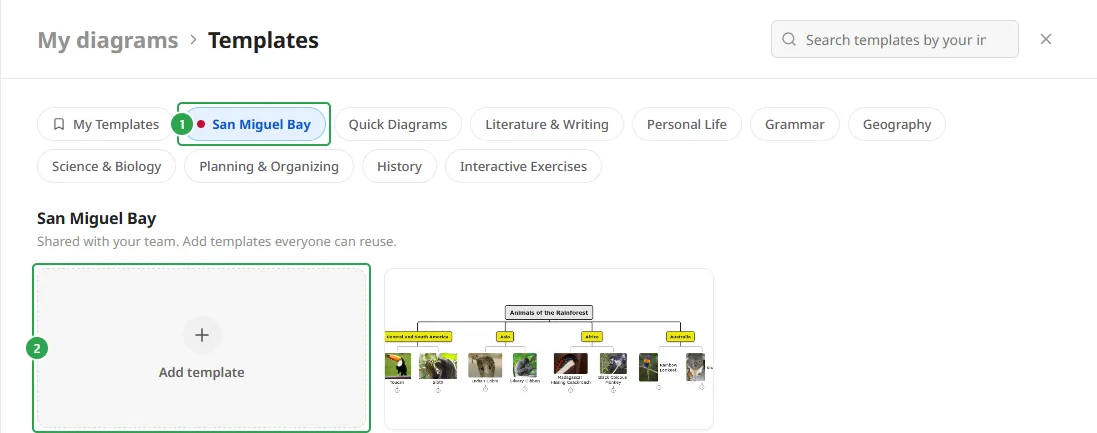
Open Templates in the dashboard sidebar and switch to your school’s own category (1), the one carrying the school name. Click Add template (2).
-
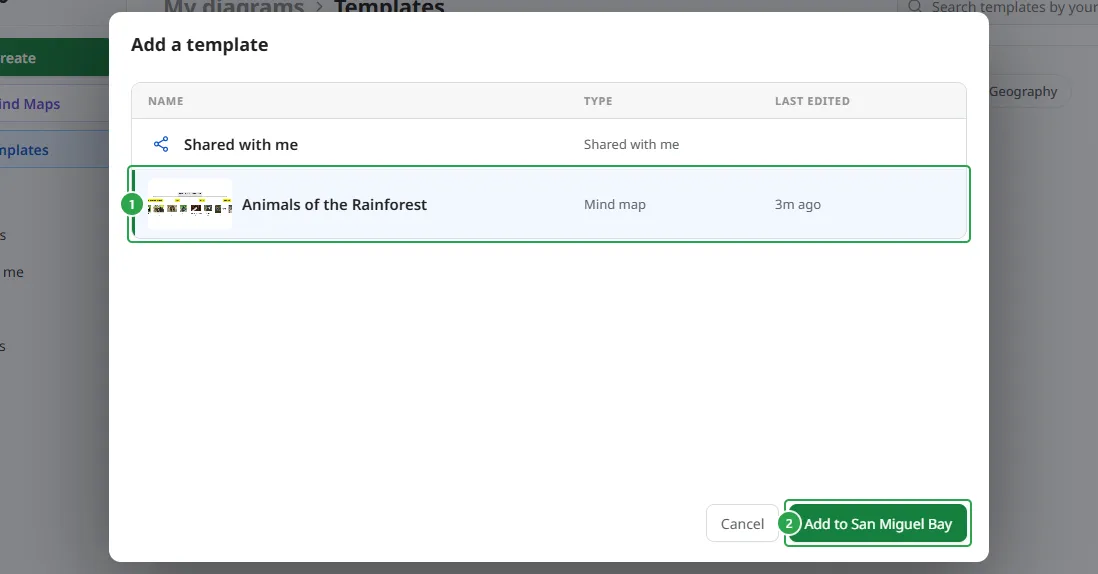
Find the diagram you personalized (1), wherever you saved it, select it, then click Add to [your school’s name] (2).
-
Teachers and students will then find it as a card under the school’s category whenever they open Templates or the Create panel. Hovering over the card reveals Use (1) and View (2).
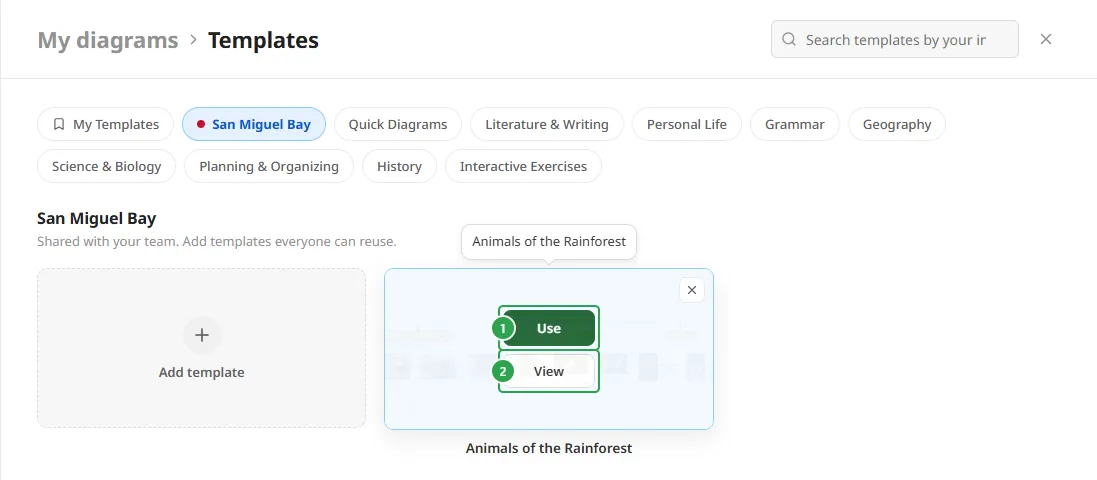
Use starts a new diagram from the template, a personal copy the teacher or student can change on their own, not a shared or collaborative map. View opens the template itself so they can look before they commit.
An × in the card’s corner removes it from the category after a confirmation; the original diagram itself isn’t deleted, only its listing as a template.