

Assignments
An assignment turns coursework into a diagram the class builds, rather than simply reads. Write the instructions once, choose the type of work students will do, and assign it to a class. From then on, every student in that class sees the assignment, works in their own copy or together in a shared one, and you follow their progress and grade the work from the same page.
Every assignment belongs to a class, and for each one you choose a student work type. Instructions, attachments, a due date and grading are optional. Students join a class once, with a code, a link or a QR code, and every assignment you give that class afterwards simply appears for them. There is nothing further for them to sign up for.
Finding assignments and classes
Section titled “Finding assignments and classes”When you open your dashboard, look at the left sidebar, under the Shared with me folder, where you’ll find two categories: Assignments (1), the list of assignments tied to your account in any role (the ones you created, the ones you co-teach and any you joined as a student), and Classes (2), which holds your rosters and their join codes.
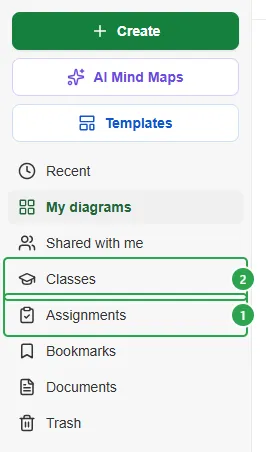
It is best to create a class first, since it is what you assign to and can reuse throughout the year: one roster, one join code, and multiple assignments.
How an assignment works
Section titled “How an assignment works”Before a class has any assignments, its page walks you through the whole cycle:
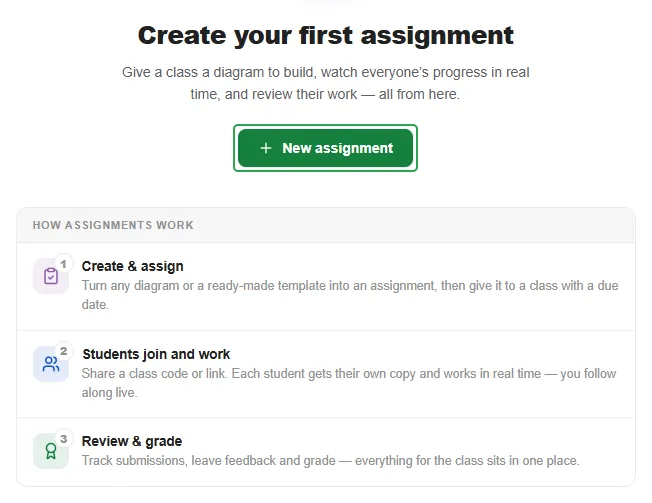
- Create & assign: turn a blank diagram, one of your own diagrams or a ready-made template into an assignment, add a due date and give it to a class.
- Students join and work: share the class code, join link or QR code. Adding students covers the other ways to bring a class in. Depending on the work type you set for that assignment, each student gets their own copy or the class works together in one shared diagram, and you follow along live.
- Review & grade: track who has started and submitted, leave feedback and grade, all from the assignment’s own page. Reviewing & grading covers the review page and the grading scales in full.
Types of assignments
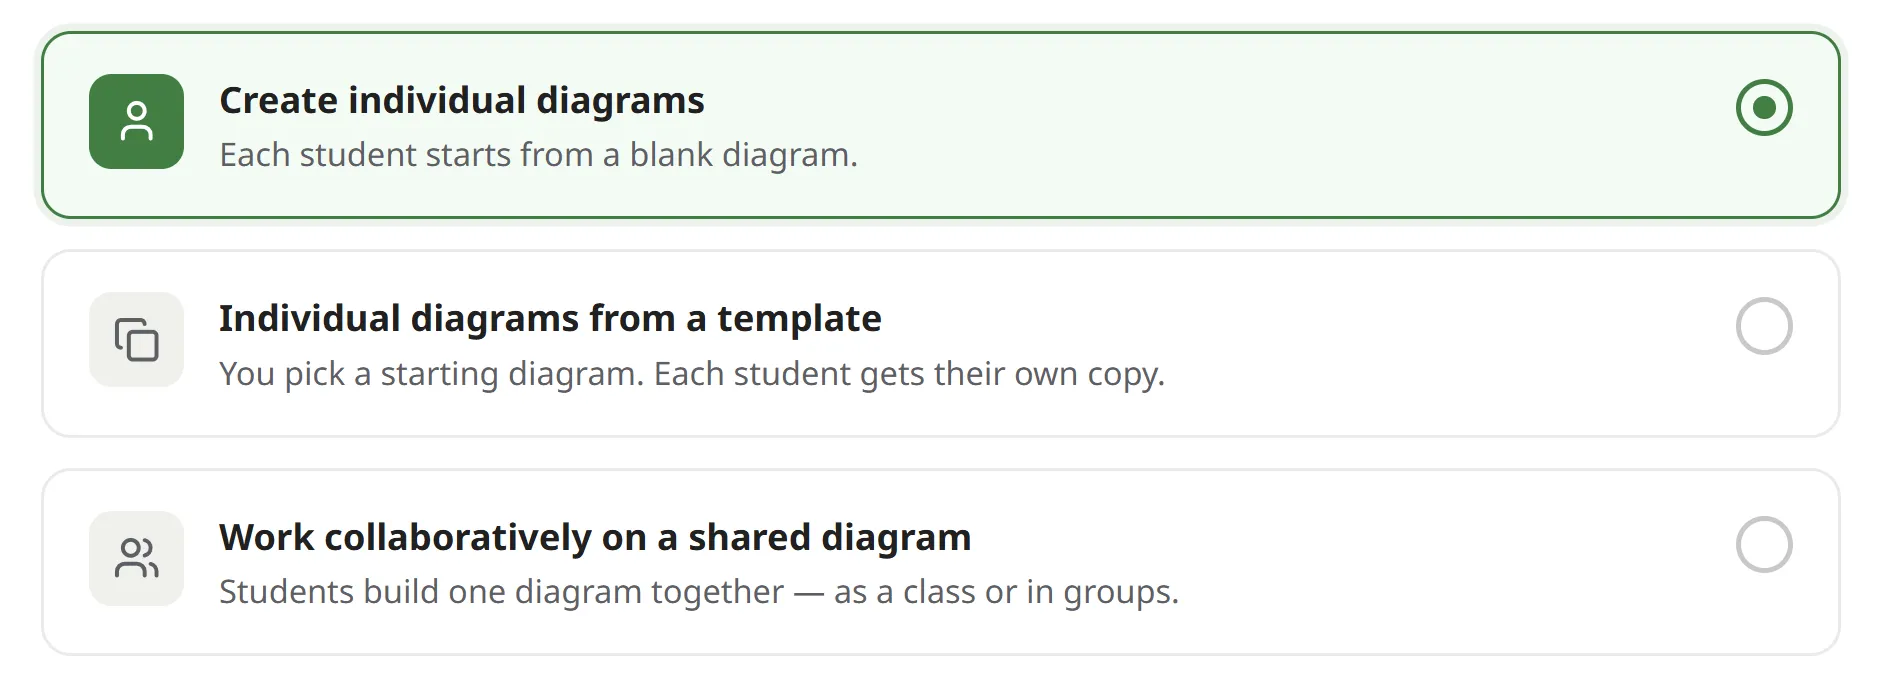
Section titled “Types of assignments”The Student work step of setting up an assignment offers three types:
- Create individual diagrams: each student starts from a blank diagram.
- Individual diagrams from a template: you pick a starting diagram, and each student gets their own copy of it.
- Work collaboratively on a shared diagram: students build one diagram together, as a class or in chosen groups.
Starting a new assignment
Section titled “Starting a new assignment”Creating a new assignment is always within reach, with three options leading into the same setup. Its three steps are Details, Student work and Assign, ending in Publish assignment:
- Option 1: click Create at the top of the sidebar, then Assignment. This takes you directly to the assignment creation page.
- Option 2: open Assignments and click the New assignment tile, pinned first in the list.
- Option 3: open a class and use its own Assignments tab.
Create an assignment walks through the three-step setup in full, including grading, templates and assigning to a class.
The Assignments list
Section titled “The Assignments list”Open Assignments and the list gives you the state of every one of them at a glance.
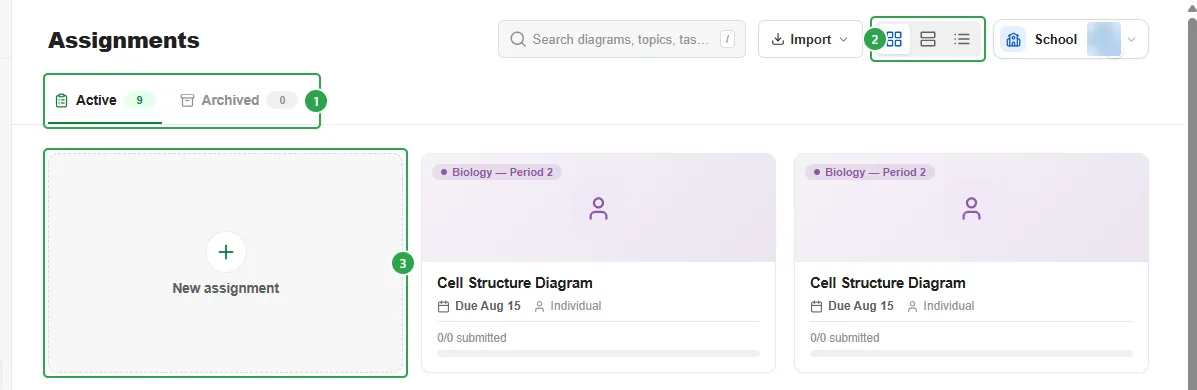
- Active and Archived each carry a count (1), and a Trash tab joins them once something has been deleted.
- The view switch (2) offers Grid, Tiles and List, the same three views the rest of the dashboard uses.
- New assignment (3) stays pinned as the first card.
- Every other card shows the class it belongs to, the title, the due date, the work type and how many students have submitted, so you have a clear overview without clicking into any of them.
After you publish an assignment
Section titled “After you publish an assignment”Opening an assignment gives you its live overview:
- Joined, Started, Submitted and To review counters across the top, one per student’s state.
- The student list underneath.
- The class join code and link, ready to share.
- An Updates box that reaches every student in the class.
- A Recent activity feed.
The page updates by itself, so there is no need to refresh it while a class is working.
What permission each person has
Section titled “What permission each person has”- The teacher who created the assignment can edit it, share it, follow it, grade it, and archive or delete it.
- Co-teachers on the class hold the same rights as the teacher who created the assignment.
- Students see the assignments given to their class and work on their own diagram, or on the shared one in a collaborative assignment.
What students see
Section titled “What students see”Students join the class once, with the access code, the join link or the QR code, and the assignment then appears in their own dashboard, where they build their diagram, submit it and read your feedback. Assignments for students walks through it from their side.
Where to go next
Section titled “Where to go next”- Assignments for students: everything the student side of an assignment looks like.
- LTI overview: give assignments from Moodle, Canvas, Blackboard, Brightspace, Schoology or itslearning.
- Google Classroom: bring a Google Classroom roster into Mindomo.
- Teacher package and School package: what each plan includes.